Wednesday, 17 March 2021

Optimize PowerApps Performance (Improve Performance of your app)

 In many enterprises, the slow performance of Power Apps has statistically been related to:

  1. The way of implementing the app
  2. the bottleneck in data sources
  3. usage patterns like browser types
  4. geographical location of on-prem data gateway and environment
  5. throttling in a gigantic volume of requests onto a backend within a brief period

Below are some more points to consider on how we can improve performance of our app by focusing more on the 1st point mentioned above (The way of implementing the app) when you build an app.

  1. Try to limit the number of controls on the screen. The time taken to render the page in PowerApps screen has a direct relation with the number of controls on the screen. There is not a defined limit but at around 300-400 controls, there have been experiences of slow loading times.
  2. Use Components rather whenever you need to reuse certain blocks like header or footer. Components also reduce duplication of efforts by eliminating the need to copy/paste controls and improve performance.
  3. Have the right data source for the task you’re looking to process through your low-code app.
  4. Loading Data on App Start, On Visible, and within individual controls like the gallery control.
  5. User Pre-loader animation to sets user expectations while data is loading.
  6. Fetch data in such a way that the required data are loaded at first and while user interaction is happening call the remaining data in the background.
  7. Use Concurrent Call in cases when you don’t have to do serial calls. Concurrent function evaluates multiple formulas at the same time
  8. User Monitor tool to find events and logs that could help diagnose performance and functional issues.
  9. Use compressed images to minimize the time to download them.
  10. Update view of the data in such a way that users see data updates reflected in the user interface while actual save (Patch/Submit) is done in the background.
  11. Avoid passing context variables between screens when a global variable is more appropriate.
  12. If you have multiple formulas or rules that reference the value of a Text input control, set the DelayOutput property of that control to true.
  13. Use inline expressions in control properties instead of putting logic in the OnVisible event in your PowerApp’s first screen. 
  14. Limit your use of collections, try to use them only when absolutely necessary.
  15. Limit your use of context variables, try to use them only when absolutely necessary.
  16. Use ClearCollect instead of Clear;Collect().
  17. Use CountIf instead of Count(Filter()).
  18. Update all necessary context variables in a single UpdateContext call
  19. Avoid using unnecessary DataCards or Canvases if they have nested galleries, which will not work in the future.
  20. Don’t use multiple variables when you could just use a single one.
  21. Don’t ‘nest’ secondary logical tests by explicitly writing If after the initial statement.
  22. User one control’s styling properties like color, fill, x, y, width, height properties as the master to style other controls.
  23. Use galleries whenever there is repetitive data instead of using multiple repeated controls to show as if it is a grid.
  24. Use a single screen to handle edit/insert operations.
  25. Use a CardGallery to handle updating data instead of referencing individual controls in a Patch function.
  26. When working with an Excel sheet as a data source, use one DataTable per worksheet.
  27. Don’t connect to more than 30 data sources from the same app.
  28. Use the ClearCollect function to cache data locally if it doesn’t change during the user session.
  29. Use the Set function to cache data from lookup tables locally to avoid repeatedly retrieving data from the source.
  30. Use functions that delegate data processing to the data source instead of retrieving data to the local device for processing.
  31. Republish your apps to get performance improvements and additional features from the Power Apps platform.
  32. Avoid repeating the same formulas in multiple places
  33. Don’t use Set to create a context variable, which holds a piece of information scoped to single-screen use UpdateContext instead.
  34. Use IsError for exception handling wherever possible
  35. Handle SubmitForm failure or success using onFailure or onSuccess.
  36. Ensure no delegation warnings from the app checker.
  37. where you can try a new formula bar experience with improved speed and usability features informed by some of the requested improvements from the community.
  38. Use HTML control to display images or displaying images to lessen the load on the Media
  39. If you are using custom APIs in your apps, you should enable server-side caching as you would do normally three tier applications.
  40. Maintain your app quality by continually validating that your app works as expected when new changes or updates are deployed using Test Studio. 

Thursday, 6 February 2020

Power Automate Limitations

Power Automate -- There are some Limit which you might not know.

1. No. of flow user can create -- 250

There is a limit of 250 flows that a single user can create. After this you simply get the error and you can’t save any more flows. If you hit the 250 limit you can raise a support ticket and then the limit will be raised.

2. Do Until Loops -- 60 runs by default

When running Do Until loops Flow will only run 60 times through the actions inside a Do until.  Luckily it is possible to change this limit within the flow editor.

Powershell script to update All Lists and Library to Modern Experience in SharePoint Online Site.

#This script uses PnPPowerShell commands, hence ensure you have already installed #SharePointPnPPowerShellOnline

#Import module
#Import-Module SharePointPnPPowerShellOnline -ErrorAction "stop"


#Specify tenant admin and site URL, credentials
$OlUser =  "adminaccountemail@domain.com"
$OlPassword = "password"
$securePassword = ConvertTo-SecureString $OlPassword -AsPlainText -Force
$OlSiteURL = "https://Online site url"

#Bind to site collection
$OlCreds = new-object -typename System.Management.Automation.PSCredential -argumentlist $OlUser, $securePassword
$SPOnlineConnection = Connect-PnPOnline -Url $OlSiteURL -Credentials $OlCreds
$OlContext = Get-PnPContext

#Disable feature at site collection level to enable modern experience at SC level
Disable-PnPFeature -Identity E3540C7D-6BEA-403C-A224-1A12EAFEE4C4 -Scope Site -Force

#Disable feature at web level to enable modern experience at web level
Disable-PnPFeature -Identity 52E14B6F-B1BB-4969-B89B-C4FAA56745EF -Scope Web -Force

#Enable new experience for all lists
$allLists = Get-PnPList
foreach($list in $allLists)
{
$OlContext.Load($list)
$OlContext.ExecuteQuery()
$list.ListExperienceOptions = "NewExperience"

$list.Update()
$OlContext.ExecuteQuery()
Write-host $list.Title -ForegroundColor Green     
}

Tuesday, 25 June 2019

Export ClientComponent of Page

Set DenyAddAndCustomizePages to Disabled for modern Sharepoint sites via PowerShell PnP cmdlet


$usr = "userid@domain.com"
$pwd = "password"
$secpasswd = ConvertTo-SecureString $pwd -AsPlainText -Force
$mycreds = New-Object System.Management.Automation.PSCredential ($usr, $secpasswd)

$adminUrl = "tenant admin url"
Connect-PnPOnline -url $adminUrl -Credentials $mycreds      // pass credentials
$pnpSite = Get-PnPTenantSite -Url $fullSiteUrl -Detailed
$pnpSite.DenyAddAndCustomizePages = "Disabled"
$pnpSite.Update()
$pnpSite.Context.ExecuteQuery()

We are setting Custom scripts disabled through above script. Hence we can add/upload custom css and scripts file to document library

SPO list Color Formatting using JSON

Conditional formatting using JSON in a SharePoint online list. I just tried to format my list items with some color code and here is my code by which the background color will get changed based on the item values.

I have created one list with one column called colors and I have entered some color name, so based on the color name, it will change the background color.


 Here is the JSON code to change the background color and text color as well. You can just copy and paste it.


  "elmType": "div", 
  "txtContent": "@currentField", 
  "style": { 
    "color": "#fff", 
    "padding-left": "14px", 
    "background-color": { 
      "operator": "?", 
      "operands": [ 
        { 
          "operator": "==", 
          "operands": [ 
            "@currentField", 
            "Green" 
          ] 
        }, 
        "#2ECC71", 
        { 
          "operator": "?", 
          "operands": [ 
            { 
              "operator": "==", 
              "operands": [ 
                "@currentField", 
                "Red" 
              ] 
            }, 
            "#E74C3C", 
            { 
              "operator": "?", 
              "operands": [ 
                { 
                 "operator": "==", 
                  "operands": [ 
                    "@currentField", 
                    "Yellow" 
                  ] 
                }, 
                "#F1C40F", 
                { 
                  "operator": "?", 
                  "operands": [ 
                    { 
                      "operator": "==", 
                      "operands": [ 
                        "@currentField", 
                        "Purple" 
                      ] 
                    }, 
                    "#76448A", 
                    "" 
                  ] 
                } 
              ] 
            } 
          ] 
        } 
      ] 
    } 
  } 

You can add the JSON code in that particular column in two ways,
  • Navigate to list setting -> column -> then add JSON code
  • You can click the title of column in list view itself then column setting and format this column and JSON code editor will open on  the right of the screen
And the final view of the list would be like below.


Saturday, 2 February 2019

SPFx - Issue and resolution about changing Webpart ID

In one of the scenarios, we needed to change the web part id, so I created a new GUID and replaced with the original Id in the ”WebPart.manifest.json” file as mentioned below.

Web Part with original GUID

SharePoint Online - SPFX Issue In Webpart.manifests.json - WebPart Id - String does not match the pattern of "^[0-9a-f]{8}-[0-9a-f]{4}-[0-9a-f]{4}-[0-9a-f]{4}-[0-9a-f]{12}$".
Fig1: Office 365 – SharePoint Online: SPFX web part - webpart.manifests.json file with original Id


Web Part with new GUID

SharePoint Online - SPFX Issue In Webpart.manifests.json - WebPart Id - String does not match the pattern of "^[0-9a-f]{8}-[0-9a-f]{4}-[0-9a-f]{4}-[0-9a-f]{4}-[0-9a-f]{12}$".
Fig2: Office 365 – SharePoint Online: SPFX web part: webpart.manifests.json file with new Id
I didn’t realize the warning coming under the new replaced GUID, as shown in the below figure.


SharePoint Online - SPFX Issue In Webpart.manifests.json - WebPart Id - String does not match the pattern of "^[0-9a-f]{8}-[0-9a-f]{4}-[0-9a-f]{4}-[0-9a-f]{4}-[0-9a-f]{12}$".

Fig3: Office 365 – SharePoint Online: SPFX web part – warning for the new GUID replaced with the original one
I started with the following commands.

gulp clean = > Successfully executed
gulp build = > Successfully executed
gulp bundle –ship =>Failed with following error:

The string does not match the pattern of”^[0-9a-f]{8}-[0-9a-f]{4}-[0-9a-f]{4}-[0-9a-f]{4}-[0-9a-f]{12}$”.

ID

It is a universally unique component id. Each client-side component is required to have this id. Once an id has been used for a component, it cannot be changed. A change in this value is treated the same as the creation of a new component. Two components are never expected to have the same id.

[11:31:59]Error – [write-manifests] Manifest validation error(./src/webparts/followedSites/FollowedSitesWebPart.manifest.json):
(#/)Data does not match any schemas from ‘oneOf’
(#/)Missing required property: description
(#/)Missing required property: extensionType
(#/component Type)No enum match for: WebPart
(#/id)String does not match pattern^[0-9a-f]{8}-[0-9a-f]{4}-[0-9a-f]{4}-[0-9a-f]{4}-[0-9a-f]{12}$:ABA304B8-E7DE-4CC0-A2CC-083E07AC5E2A
(#/)Missing required property: items
(#/)Missing required property: root ComponentId
About to exit with code: 0
Process terminated before summary could be written, possible error in async code not continuing!
Trying to exit with exit code 1


Solution
As gulp bundle –ship command failed with the above issue.
Then, I looked into the warning and realized the issue. I noticed the difference between web part IDs.
The original ID of the web part was in lowercase letters and the ID that I manually updated was in uppercase letters. Then, I saw the regular expression which threw the error and a warning as well – ^[0-9a-f]{8}-[0-9a-f]{4}-[0-9a-f]{4}-[0-9a-f]{4}-[0-9a-f]{12}$ So, I changed the new ID in lowercase letters.

Well, that worked! I could execute the gulp bundle –ship command successfully.
This seems to be a weird issue but it’s by design. I didn’t understand the logic behind this anyway.

Conclusion/Takeaway
Always use GUID in lowercase letters.

Tuesday, 1 January 2019

Secure Store Target Application

When you want to use external data, such as data from your other business applications or partner resources) in SharePoint, you can use Business Connectivity Services (BCS) together with Secure Store. And, you can manage BCS and Secure Store right in the SharePoint admin center. The external data source that you can connect to is called a Secure Store Target Application, or just a Target Application.

How the Secure Store Service Works

The Secure Store Service is designed to create a background mapping between a group of users in SharePoint, and a single user known to the external data system. When the Secure Store Service is properly configured, the following occurs:
  • A user authenticates through Internet Information Services (the web server technology underlying SharePoint technologies) to SharePoint Online via valid credentials.
  • Inside SharePoint Online, the Secure Store Service uses mapped credentials known to the external business application to render any necessary external data on the site for the authenticated user.
Another benefit of the Secure Store Service is that it eliminates authentication prompts for users. When users navigate to SharePoint Online pages that access external data systems, the Secure Store Service is active in the background, checking user rights and providing mapped credentials to the external data when appropriate.
Create a Target Application

  1. Sign in to Office 365 as a global admin or SharePoint admin.
  2. Select the app launcher icon The app launcher icon in Office 365 in the upper-left and choose Admin to open the Microsoft 365 admin center. (If you don't see the Admin tile, you don't have Office 365 administrator permissions in your organization.)
  3. In the left pane, choose Admin centers > SharePoint.
  4. Click secure store
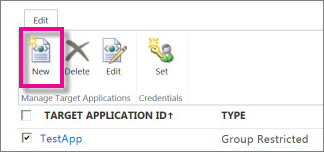
  5. In the Manage Target Applications group on the ribbon, click New.
    Screenshot of the SharePoint Online Administration Center page for configuring a SecureStore Target Application.
  6. In the Target Application Settings section, enter values for the following fields:
  7. Target Application ID. You might find it useful to assign a meaningful name. For example, if you are connecting to source that contains employee data, you might enter EmployeeTargetApp.
  8. Display Name. This field should be a user-friendly name for the Target Application. For example, you might use Employee Data.
  9. Contact E-mail Enter a valid email address for people to use when they have questions.
  10. Target Application Type. By default, SharePoint Online uses type Group Restricted.
  11. In the Credential Fields section, enter the Field Names and Field Types for the credentials that are required to access data in the Target Application. These fields determine how you will map identity in the Secure Store Service. By default, the Credential Fields list the Windows User Name and Windows Password with matching Field Types (User Name and Password), and specifies that the password is masked.
  12. In the Target Application Administrators section, enter a list of users, or use the Browse button to search for the name of a group. This section usually contains the account of the SharePoint Online Administrator, or a global Administrator.
  13. In the Members section, enter a list of users or SharePoint Online groups of users who need to access the target application. Or, you can use the Browse button to search for the name of a group that you want to map to the Target Application.
  14. Click OK to accept this configuration and return to the Secure Storage Service page. The new Target Application appears on the page.

    Edit settings for a Target Application

  1. Sign in to Office 365 as a global admin or SharePoint admin.
  2. Select the app launcher icon The app launcher icon in Office 365 in the upper-left and choose Admin to open the Microsoft 365 admin center. (If you don't see the Admin tile, you don't have Office 365 administrator permissions in your organization.)
  3. In the left pane, choose Admin centers > SharePoint.
  4. Click secure store.
  5. Select an existing Target Application from the list of Target Applications.
  6. On the ribbon, click Edit.
    Note
    Some fields on the Edit page are not available. These elements cannot be edited. After you create a Target Application, you can't change the Target Application ID, Target Application Type, or Credentials Fields.
  7. Select any of the following to edit the contents:
  • Display Name
  • Contact E-mail
  • Target Application Administrators
  • Members
  1. Click OK.
 Set credentials for a Target Application

  1. Sign in to Office 365 as a global admin or SharePoint admin.
  2. Select the app launcher icon The app launcher icon in Office 365 in the upper-left and choose Admin to open the Microsoft 365 admin center. (If you don't see the Admin tile, you don't have Office 365 administrator permissions in your organization.)
  3. In the left pane, choose Admin centers > SharePoint.
  4. Click secure store.
  5. Select a single Target Application from the list if you have created more than one.
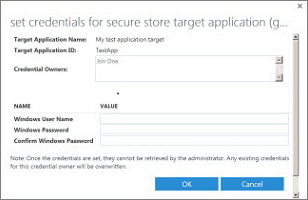
  6. In the Credentials group on the ribbon, click Set. This opens the Set Credentials for Secure Store Target Application (Group) dialog box. When you set credentials, you map a Target Application Group to a single set of credentials for an external data system.
    Screenshot of the "Set credentials for a Secure Store Target Application" dialog. You can use this dialog to set the logon credentials for an external data source
  7. In the Set Credentials for Secure Store Target Application (Group) dialog box, enter the credential values that you want. The credential fields that you enter apply to the external data system.When you finish entering values for credential fields, click OK.

Saturday, 29 December 2018

IT Governance in SharePoint

Applicable to SP 2013/2016/2019

How will you control the services that you offer? What will you provide with each service? What will you include in service-level agreements for each service? And how do you prevent proliferation of unmanaged servers? These questions should be answered as part of your IT governance plan.
Develop a good governance plan when you create an IT service to support SharePoint. A good governance plan ensures that the service meets the business needs of your organization securely and cost-effectively. When you add to the service, a good governance plan helps you do so seamlessly. A good governance plan to run a successful IT service should include:
  • Governance team defines the initial offerings of the service and its ongoing policies, and meets regularly to evaluate success.
  • The policies you develop are communicated to your organization and are enforced.
  • Users are encouraged to use the service and not create their own solutions. Installations are tracked and rogue installations are blocked.

What is a SharePoint service?

A SharePoint service is an IT service that offers hosted sites based on SharePoint. The benefits of a SharePoint service include backup and recovery, content storage, support for customization, security, and service levels based on speed and availability as show in the following illustration.

Elements of a successful service

As you plan and implement your SharePoint service, consider the following elements that can contribute to the success of the governing effort:
  • Form and use a governing group. Your IT service for SharePoint should be governed by a group that includes executive stakeholders, business division leaders, influential information workers, IT managers, and IT technical specialists, among others. The goal of the governing group should be to oversee the service. In this capacity, the governing group defines the initial offerings of the service, defines the service's ongoing policies, and meets regularly to evaluate success.
  • Communicate the policies. The governance policies that you develop must be publicized to your organization. Maintain a website that describes the service.
  • Encourage use of the service. Discourage or block users from deploying their own servers. Instead, encourage them to use the service. Isolated servers may not be configured according to IT security policy and the organization's regulatory requirements. Furthermore, users who deploy their own servers may not properly back up their servers or keep servers up-to date with software patches and updates. Finally, content on servers that are not governed by the service may not be detected by the organization's indexing service, which may create isolated pockets of content.

What to govern in a SharePoint service

Determine limits and policies for the areas shown in the following table.
Areas that should have limits or policies in a governance plan
AreaRecommendation
Security, infrastructure, and web application policies How is the system and infrastructure maintained and who has access at what levels? What's the maximum upload size you want to allow? Are you controlling the use of fine-grained permissions
Data protection (backup and recoveryVary the level of data protection that you offer based on service levels. Plan how often you back up the farms and how quickly you can guarantee the data is restored. 
Site policies Use site policies to help control site proliferation. A site policy defines the life cycle of a site by specifying when the site will be closed and when it will be deleted. When you close or delete a site, any subsites are also closed or deleted. If an Exchange mailbox is associated with a site, the mailbox is deleted from Exchange Server 2013 when the site is deleted. 
Quotas Quota templates define how much data can be stored in a site collection and the maximum size of uploaded files. Associate different quota templates with site collections at different service levels. 
Asset classification Classify sites and content by value and impact of the content to the organization (such as high, medium, or low business value/impact). That classification then controls other requirements, such as encryption for high business impact information. 
Impact = Exposure 
If this leaks, will it hurt my business? 
Value = Availability 
If this isn't available, can my business run? 

Service-level agreements

Your organization should create appropriate service-level agreements for each service you provide. A good service-level agreement should include:
  • The approval process, including the length of time and approvals necessary to create a site.
  • Costs for users or departments.
  • Operations-level agreement, which specifies which teams perform which operations and how frequently.
  • Policies around problem resolution through a support team.
  • Negotiated performance targets for first load of a site, subsequent loads, and performance at remote locations.
  • Recovery, load balancing, and failover strategies.
  • Customization policies.
  • Storage limits for content and sites.
  • How to handle inactive or stale sites.
  • Multilingual support.

Deployment governance

In addition to governing services that you offer, you also need to govern installations of SharePoint in your environment.
  • Track installations An Active Directory Domain Services (AD DS) marker named Service Connection Point identifies the SharePoint servers in an organization. Set this marker for each domain in your organization if you want to track installations in all domains. See Track or block SharePoint Server 2010 installations.
  • Block installations You can block installations of SharePoint Server 2016 to prevent users from installing it to unauthorized servers that you don't want to support. Use a Group Policy in Active Directory Domain Services (AD DS) to set a registry key on all servers to block installations. This registry key existed by default in SharePoint Server 2010, but is not included in SharePoint Server 2016. You can create it yourself in the registry if you want to block installations. See Track or block SharePoint Server 2010 installations.
  • Keep current with software updates Keep your servers current. Test and install recommended software updates. See the Updates Resource Center for SharePoint Server 2016.
  • Site collection upgrades Site collections can now be upgraded independently from the content databases. Determine who, when, and how to upgrade site collections when a new version or an update is available. See Plan for site collection upgrades in SharePoint 2013.