
Tuesday, 25 June 2019

Set DenyAddAndCustomizePages to Disabled for modern Sharepoint sites via PowerShell PnP cmdlet
$usr = "userid@domain.com"
$pwd = "password"
$secpasswd = ConvertTo-SecureString $pwd -AsPlainText -Force
$mycreds = New-Object System.Management.Automation.PSCredential ($usr, $secpasswd)
$adminUrl = "tenant admin url"
Connect-PnPOnline -url $adminUrl -Credentials $mycreds // pass credentials
$pnpSite = Get-PnPTenantSite -Url $fullSiteUrl -Detailed
$pnpSite.DenyAddAndCustomizePages = "Disabled"
$pnpSite.Update()
$pnpSite.Context.ExecuteQuery()
We are setting Custom scripts disabled through above script. Hence we can add/upload custom css and scripts file to document library
SPO list Color Formatting using JSON
Conditional formatting using JSON in a SharePoint online list. I just tried to format my list items with some color code and here is my code by which the background color will get changed based on the item values.
I have created one list with one column called colors and I have entered some color name, so based on the color name, it will change the background color.


I have created one list with one column called colors and I have entered some color name, so based on the color name, it will change the background color.
Here is the JSON code to change the background color and text color as well. You can just copy and paste it.
{
"elmType": "div",
"txtContent": "@currentField",
"style": {
"color": "#fff",
"padding-left": "14px",
"background-color": {
"operator": "?",
"operands": [
{
"operator": "==",
"operands": [
"@currentField",
"Green"
]
},
"#2ECC71",
{
"operator": "?",
"operands": [
{
"operator": "==",
"operands": [
"@currentField",
"Red"
]
},
"#E74C3C",
{
"operator": "?",
"operands": [
{
"operator": "==",
"operands": [
"@currentField",
"Yellow"
]
},
"#F1C40F",
{
"operator": "?",
"operands": [
{
"operator": "==",
"operands": [
"@currentField",
"Purple"
]
},
"#76448A",
""
]
}
]
}
]
}
]
}
}
}
"elmType": "div",
"txtContent": "@currentField",
"style": {
"color": "#fff",
"padding-left": "14px",
"background-color": {
"operator": "?",
"operands": [
{
"operator": "==",
"operands": [
"@currentField",
"Green"
]
},
"#2ECC71",
{
"operator": "?",
"operands": [
{
"operator": "==",
"operands": [
"@currentField",
"Red"
]
},
"#E74C3C",
{
"operator": "?",
"operands": [
{
"operator": "==",
"operands": [
"@currentField",
"Yellow"
]
},
"#F1C40F",
{
"operator": "?",
"operands": [
{
"operator": "==",
"operands": [
"@currentField",
"Purple"
]
},
"#76448A",
""
]
}
]
}
]
}
]
}
}
}
You can add the JSON code in that particular column in two ways,
- Navigate to list setting -> column -> then add JSON code
- You can click the title of column in list view itself then column setting and format this column and JSON code editor will open on the right of the screen
And the final view of the list would be like below.
Saturday, 2 February 2019
SPFx - Issue and resolution about changing Webpart ID
In one of the scenarios, we
needed to change the web part id, so I created a new GUID and replaced
with the original Id in the ”WebPart.manifest.json” file as mentioned
below.
Web Part with original GUID
![SharePoint Online - SPFX Issue In Webpart.manifests.json - WebPart Id - String does not match the pattern of "^[0-9a-f]{8}-[0-9a-f]{4}-[0-9a-f]{4}-[0-9a-f]{4}-[0-9a-f]{12}$".](https://csharpcorner-mindcrackerinc.netdna-ssl.com/UploadFile/BlogImages/12162018000308AM/fig1_web part with orginal guid.png)
![SharePoint Online - SPFX Issue In Webpart.manifests.json - WebPart Id - String does not match the pattern of "^[0-9a-f]{8}-[0-9a-f]{4}-[0-9a-f]{4}-[0-9a-f]{4}-[0-9a-f]{12}$".](https://csharpcorner-mindcrackerinc.netdna-ssl.com/UploadFile/BlogImages/12162018000308AM/fig2_web part with new guid.png)
![SharePoint Online - SPFX Issue In Webpart.manifests.json - WebPart Id - String does not match the pattern of "^[0-9a-f]{8}-[0-9a-f]{4}-[0-9a-f]{4}-[0-9a-f]{4}-[0-9a-f]{12}$".](https://csharpcorner-mindcrackerinc.netdna-ssl.com/UploadFile/BlogImages/12162018000308AM/fig3_Warning for new GUID.png)
Web Part with original GUID
Fig1: Office 365 – SharePoint Online: SPFX web part - webpart.manifests.json file with original Id
Web Part with new GUID
Fig2: Office 365 – SharePoint Online: SPFX web part: webpart.manifests.json file with new Id
I didn’t realize the warning coming under the new replaced GUID, as shown in the below figure.
Fig3: Office 365 – SharePoint Online: SPFX web part – warning for the new GUID replaced with the original one
I started with the following commands.
gulp clean = > Successfully executed
gulp build = > Successfully executed
gulp bundle –ship =>Failed with following error:
The string does not match the pattern of”^[0-9a-f]{8}-[0-9a-f]{4}-[0-9a-f]{4}-[0-9a-f]{4}-[0-9a-f]{12}$”.
ID
It is a universally unique component id. Each client-side component is required to have this id. Once an id has been used for a component, it cannot be changed. A change in this value is treated the same as the creation of a new component. Two components are never expected to have the same id.
[11:31:59]Error – [write-manifests] Manifest validation error(./src/webparts/followedSites/FollowedSitesWebPart.manifest.json):
(#/)Data does not match any schemas from ‘oneOf’
(#/)Missing required property: description
(#/)Missing required property: extensionType
(#/component Type)No enum match for: WebPart
(#/id)String does not match pattern^[0-9a-f]{8}-[0-9a-f]{4}-[0-9a-f]{4}-[0-9a-f]{4}-[0-9a-f]{12}$:ABA304B8-E7DE-4CC0-A2CC-083E07AC5E2A
(#/)Missing required property: items
(#/)Missing required property: root ComponentId
About to exit with code: 0
Process terminated before summary could be written, possible error in async code not continuing!
Trying to exit with exit code 1
Solution
The original ID of the web part was in lowercase letters and the ID that I manually updated was in uppercase letters. Then, I saw the regular expression which threw the error and a warning as well – ^[0-9a-f]{8}-[0-9a-f]{4}-[0-9a-f]{4}-[0-9a-f]{4}-[0-9a-f]{12}$ So, I changed the new ID in lowercase letters.
Well, that worked! I could execute the gulp bundle –ship command successfully.
This seems to be a weird issue but it’s by design. I didn’t understand the logic behind this anyway.
Conclusion/Takeaway
gulp clean = > Successfully executed
gulp build = > Successfully executed
gulp bundle –ship =>Failed with following error:
The string does not match the pattern of”^[0-9a-f]{8}-[0-9a-f]{4}-[0-9a-f]{4}-[0-9a-f]{4}-[0-9a-f]{12}$”.
ID
It is a universally unique component id. Each client-side component is required to have this id. Once an id has been used for a component, it cannot be changed. A change in this value is treated the same as the creation of a new component. Two components are never expected to have the same id.
[11:31:59]Error – [write-manifests] Manifest validation error(./src/webparts/followedSites/FollowedSitesWebPart.manifest.json):
(#/)Data does not match any schemas from ‘oneOf’
(#/)Missing required property: description
(#/)Missing required property: extensionType
(#/component Type)No enum match for: WebPart
(#/id)String does not match pattern^[0-9a-f]{8}-[0-9a-f]{4}-[0-9a-f]{4}-[0-9a-f]{4}-[0-9a-f]{12}$:ABA304B8-E7DE-4CC0-A2CC-083E07AC5E2A
(#/)Missing required property: items
(#/)Missing required property: root ComponentId
About to exit with code: 0
Process terminated before summary could be written, possible error in async code not continuing!
Trying to exit with exit code 1
Solution
As gulp bundle –ship command failed with the above issue.
Then, I looked into the warning and realized the issue. I noticed the difference between web part IDs.The original ID of the web part was in lowercase letters and the ID that I manually updated was in uppercase letters. Then, I saw the regular expression which threw the error and a warning as well – ^[0-9a-f]{8}-[0-9a-f]{4}-[0-9a-f]{4}-[0-9a-f]{4}-[0-9a-f]{12}$ So, I changed the new ID in lowercase letters.
Well, that worked! I could execute the gulp bundle –ship command successfully.
This seems to be a weird issue but it’s by design. I didn’t understand the logic behind this anyway.
Conclusion/Takeaway
Always use GUID in lowercase letters.
Tuesday, 1 January 2019
Secure Store Target Application
When you want to use external data, such as data from your other
business applications or partner resources) in SharePoint, you can use
Business Connectivity Services (BCS) together with Secure Store. And,
you can manage BCS and Secure Store right in the SharePoint admin
center. The external data source that you can connect to is called a
Secure Store Target Application, or just a Target Application.
How the Secure Store Service Works
Create a Target Application
How the Secure Store Service Works
The Secure Store Service is designed to create a background
mapping between a group of users in SharePoint, and a single user known
to the external data system. When the Secure Store Service is properly
configured, the following occurs:
- A user authenticates through Internet Information Services (the
web server technology underlying SharePoint technologies) to SharePoint
Online via valid credentials.
- Inside SharePoint Online, the Secure Store Service uses mapped
credentials known to the external business application to render any
necessary external data on the site for the authenticated user.
Create a Target Application
- Sign in to Office 365 as a global admin or SharePoint admin.
- Select the app launcher icon
 in the upper-left and choose Admin
to open the Microsoft 365 admin center. (If you don't see the Admin
tile, you don't have Office 365 administrator permissions in your
organization.)
in the upper-left and choose Admin
to open the Microsoft 365 admin center. (If you don't see the Admin
tile, you don't have Office 365 administrator permissions in your
organization.) - In the left pane, choose Admin centers > SharePoint.
- Click secure store
- In the Manage Target Applications group on the ribbon, click New.
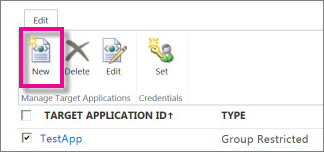
- In the Target Application Settings section, enter values for the following fields:
- Target Application ID. You might find it useful
to assign a meaningful name. For example, if you are connecting to
source that contains employee data, you might enter EmployeeTargetApp.
- Display Name. This field should be a user-friendly name for the Target Application. For example, you might use Employee Data.
- Contact E-mail Enter a valid email address for people to use when they have questions.
- Target Application Type. By default, SharePoint Online uses type Group Restricted.
- In the Credential Fields section, enter the Field Names and Field Types
for the credentials that are required to access data in the Target
Application. These fields determine how you will map identity in the
Secure Store Service. By default, the Credential Fields list the Windows
User Name and Windows Password with matching Field Types (User Name and
Password), and specifies that the password is masked.
- In the Target Application Administrators
section, enter a list of users, or use the Browse button to search for
the name of a group. This section usually contains the account of the
SharePoint Online Administrator, or a global Administrator.
- In the Members section, enter a list of users or
SharePoint Online groups of users who need to access the target
application. Or, you can use the Browse button to search for the name of
a group that you want to map to the Target Application.
- Click OK to accept this configuration and return to the Secure Storage Service page. The new Target Application appears on the page.
Edit settings for a Target Application
- Sign in to Office 365 as a global admin or SharePoint admin.
- Select the app launcher icon in the upper-left and choose Admin
to open the Microsoft 365 admin center. (If you don't see the Admin
tile, you don't have Office 365 administrator permissions in your
organization.)
- In the left pane, choose Admin centers > SharePoint.
- Click secure store.
- Select an existing Target Application from the list of Target Applications.
- On the ribbon, click Edit.
NoteSome fields on the Edit page are not available. These elements cannot be edited. After you create a Target Application, you can't change the Target Application ID, Target Application Type, or Credentials Fields.
- Select any of the following to edit the contents:
- Display Name
- Contact E-mail
- Target Application Administrators
- Members
- Click OK.
- Sign in to Office 365 as a global admin or SharePoint admin.
- Select the app launcher icon in the upper-left and choose Admin
to open the Microsoft 365 admin center. (If you don't see the Admin
tile, you don't have Office 365 administrator permissions in your
organization.)
- In the left pane, choose Admin centers > SharePoint.
- Click secure store.
- Select a single Target Application from the list if you have created more than one.
- In the Credentials group on the ribbon, click Set. This opens the Set Credentials for Secure Store Target Application (Group)
dialog box. When you set credentials, you map a Target Application
Group to a single set of credentials for an external data system.
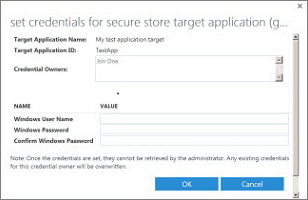
- In the Set Credentials for Secure Store Target Application (Group) dialog box, enter the credential values that you want. The credential fields that you enter apply to the external data system.When you finish entering values for credential fields, click OK.
Saturday, 29 December 2018
IT Governance in SharePoint
Applicable to SP 2013/2016/2019
How will you control the services that you offer? What will you provide with each service? What will you include in service-level agreements for each service? And how do you prevent proliferation of unmanaged servers? These questions should be answered as part of your IT governance plan.
Develop a good governance plan when you create an IT service to support SharePoint. A good governance plan ensures that the service meets the business needs of your organization securely and cost-effectively. When you add to the service, a good governance plan helps you do so seamlessly. A good governance plan to run a successful IT service should include:
- A Governance team defines the initial offerings of the service and its ongoing policies, and meets regularly to evaluate success.
- The policies you develop are communicated to your organization and are enforced.
- Users are encouraged to use the service and not create their own solutions. Installations are tracked and rogue installations are blocked.
What is a SharePoint service?
A SharePoint service is an IT service that offers hosted sites based on SharePoint. The benefits of a SharePoint service include backup and recovery, content storage, support for customization, security, and service levels based on speed and availability as show in the following illustration.
Elements of a successful service
As you plan and implement your SharePoint service, consider the following elements that can contribute to the success of the governing effort:
- Form and use a governing group. Your IT service for SharePoint should be governed by a group that includes executive stakeholders, business division leaders, influential information workers, IT managers, and IT technical specialists, among others. The goal of the governing group should be to oversee the service. In this capacity, the governing group defines the initial offerings of the service, defines the service's ongoing policies, and meets regularly to evaluate success.
- Communicate the policies. The governance policies that you develop must be publicized to your organization. Maintain a website that describes the service.
- Encourage use of the service. Discourage or block users from deploying their own servers. Instead, encourage them to use the service. Isolated servers may not be configured according to IT security policy and the organization's regulatory requirements. Furthermore, users who deploy their own servers may not properly back up their servers or keep servers up-to date with software patches and updates. Finally, content on servers that are not governed by the service may not be detected by the organization's indexing service, which may create isolated pockets of content.
What to govern in a SharePoint service
Determine limits and policies for the areas shown in the following table.
Areas that should have limits or policies in a governance plan
| Area | Recommendation |
|---|---|
| Security, infrastructure, and web application policies | How is the system and infrastructure maintained and who has access at what levels? What's the maximum upload size you want to allow? Are you controlling the use of fine-grained permissions? |
| Data protection (backup and recovery) | Vary the level of data protection that you offer based on service levels. Plan how often you back up the farms and how quickly you can guarantee the data is restored. |
| Site policies | Use site policies to help control site proliferation. A site policy defines the life cycle of a site by specifying when the site will be closed and when it will be deleted. When you close or delete a site, any subsites are also closed or deleted. If an Exchange mailbox is associated with a site, the mailbox is deleted from Exchange Server 2013 when the site is deleted. |
| Quotas | Quota templates define how much data can be stored in a site collection and the maximum size of uploaded files. Associate different quota templates with site collections at different service levels. |
| Asset classification | Classify sites and content by value and impact of the content to the organization (such as high, medium, or low business value/impact). That classification then controls other requirements, such as encryption for high business impact information. Impact = Exposure If this leaks, will it hurt my business? Value = Availability If this isn't available, can my business run? |
Service-level agreements
Your organization should create appropriate service-level agreements for each service you provide. A good service-level agreement should include:
- The approval process, including the length of time and approvals necessary to create a site.
- Costs for users or departments.
- Operations-level agreement, which specifies which teams perform which operations and how frequently.
- Policies around problem resolution through a support team.
- Negotiated performance targets for first load of a site, subsequent loads, and performance at remote locations.
- Recovery, load balancing, and failover strategies.
- Customization policies.
- Storage limits for content and sites.
- How to handle inactive or stale sites.
- Multilingual support.
Deployment governance
In addition to governing services that you offer, you also need to govern installations of SharePoint in your environment.
- Track installations An Active Directory Domain Services (AD DS) marker named Service Connection Point identifies the SharePoint servers in an organization. Set this marker for each domain in your organization if you want to track installations in all domains. See Track or block SharePoint Server 2010 installations.
- Block installations You can block installations of SharePoint Server 2016 to prevent users from installing it to unauthorized servers that you don't want to support. Use a Group Policy in Active Directory Domain Services (AD DS) to set a registry key on all servers to block installations. This registry key existed by default in SharePoint Server 2010, but is not included in SharePoint Server 2016. You can create it yourself in the registry if you want to block installations. See Track or block SharePoint Server 2010 installations.
- Keep current with software updates Keep your servers current. Test and install recommended software updates. See the Updates Resource Center for SharePoint Server 2016.
- Site collection upgrades Site collections can now be upgraded independently from the content databases. Determine who, when, and how to upgrade site collections when a new version or an update is available. See Plan for site collection upgrades in SharePoint 2013.
SharePoint hub sites
What is a SharePoint hub site? help you organize your intranet. Getting the most value from hub sites requires some up-front planning.
Setting the stage


Setting the stage
SharePoint hub sites provide an important building block for your intranet. They are the "connective tissue" you use when organizing families of team sites and communication sites together.
One of the key principles of modern intranets based on SharePoint is that each unit of work should get a separate site collection to optimally manage governance and growth over time. Each communication site and Office 365 group-connected team site is created as a site collection that can have its own permissions. A hub site (most commonly created from a communication site) should also be considered its own unit of work that brings together numerous other sites.
In the past, many organizations used subsites to create connective tissue for their intranets, using the site collection's shared navigation to connect sites and the hierarchical structure of subsite relationships to nest sites within sites. However, subsites don't give any room for flexibility and change. Since subsites are a physical construct reflected in the URL for content, if you reorganize your business relationships, you will break all the intranet relationships in your content. Subsites can also create challenges when it comes to governance because many features (including policy features like retention and classification) in SharePoint apply to all sites within the site collection, whether you want them to or not. This means that you must frequently enable a feature for the entire site collection, even if it's only applicable to one subsite.
What is the one thing that we can guarantee is going to happen in every business? Change! As our organization evolves, you need intranets that make it easy to align experiences with the way you work and that can adapt to the inevitable changes in the way you work. This is a key benefit provided by SharePoint hub sites; they model relationships as links, rather than hierarchy or ownership, so that you can adapt to the changes in the way you work in a dynamic, changing world.
Office 365 provides three main building blocks to help you create your intranet in a way that allows you to configure experiences that align with your business, your employees, and your readiness. Different organizations will use the building blocks in different ways, but the building blocks themselves reflect common patterns that organizations use to get work done:
- Team sites (collaboration)
- Communication sites (communication)
- Hub sites (connection)
What should be a hub site?
Hub sites complement the search experience by helping you discover information in context.
One of the biggest challenges with intranet design is figuring out how the intranet navigation should be organized. In the new world where all team and communication sites are peer site collections, information architects must think about creating experiences that will allow intranet users to find what they need in multiple "find" scenarios:
- I know it exists, and I know where it is
- I know it exists, but I don't know where it is
- I don't know if it exists
These scenarios are enabled with a combination of navigation, search, and discovery (or serendipity) and should be a factor in how you design and organize your hub sites. One of the important capabilities that hub sites enable is the serendipitous discovery of information because they can surface contextually relevant content from sites you may not follow but are associated with the hub. SharePoint Home was built to support discovery and search across the entire organization's content, but if you already have a particular context in mind, hub sites can be very helpful in narrowing those experiences down to a handful of related sites.
As a starting point in your hub planning, think about hub sites for key functions that your users need to get work done—for example: HR, Finance, Communications or Public Relations, Legal, and IT. These functions may be represented in different organizational departments or business units in large organizations or combined into the role of a few people in smaller organizations.
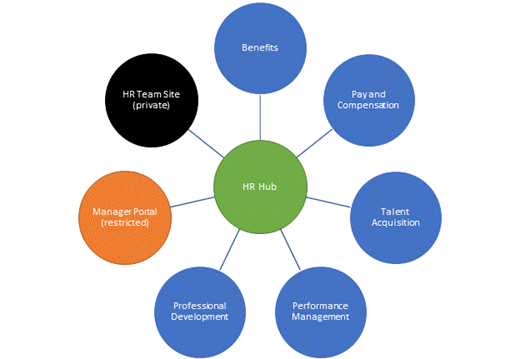
Let's take HR as an example. HR often encompasses the following sub-functions:
- Benefits
- Pay and compensation
- Talent acquisition or recruiting
- Performance management
- Professional development or training
- Manager portal
Using the guiding principle of creating a site for each unit of work, you can think about an HR family of sites that could include 6 functional sites for each of these functions plus an HR home that connects the related sites to provide an overall HR experience. This is another way to think about the value of hub sites: they allow you to create an experience that improves information discovery for a specific context (in our example, for employees looking for HR information).
In the classic intranet model, you might have created an HR site and used subsites to support each HR function. In the new flat world of modern SharePoint sites, the HR family is connected using the HR hub to provide that connective tissue for navigation within the family and to provide an opportunity to serendipitously discover content on a related member of the family when users navigate to the HR home. For example, if you're on the HR hub reading a news announcement about open enrollment because you're in the process of onboarding a new employee, you might be happy to know that a new version of the "Welcome to the Company" onboarding toolkit was just released on the Talent Acquisition site. Likewise, if you're trying to find the HR team's office sharing policy, you'll appreciate being able to limit your search to only the HR-affiliated sites, rather than the entire company.
You don't have to have a hub site for every function. However, when a function provides multiple logically different services (as in the HR example), it's a good practice to create a hub site to provide a single starting place for your users. Often, intranet users start their exploration with browsing. Hub sites help combine the benefits of browsing ("I know this is an HR topic") with the benefits of a more narrowly scoped search ("I want to find information about vision benefits, not the company's strategic vision."). Even if the users don't know which sub-function provides a service, they can navigate to the HR hub and then, using the search scope provided by the hub, search (or navigate) within the HR hub to quickly find what they need.
Know how your audience will consume SharePoint hub sites
Your audience might consume SharePoint hub sites via the SharePoint home in Office 365—both the sites themselves and how news flows from hub to home. Also, consider SharePoint mobile apps, which could be used to access the hub home page, news, and navigation to associated sites. Consider the value of mobile app notifications. Encourage your users to stay connected on the go with the SharePoint mobile app. Make sure that you consider operating systems, screen sizes, resolution, and form factors. All modern sites, pages, news, and lists should work well across all of these, and some will reflow as people consume content on small devices.
Additional important considerations
- Finding hubs if you have more than one. Hub sites are an important building block for your intranet. But for most organizations, hub sites are not going to provide the type of global navigation that intranet designers want. Here are some ways you can make your hub sites discoverable:
- On SharePoint home. Pin your hub sites to the Featured links area of SharePoint home. Encourage all users to "follow" hub sites.
- On the SharePoint mobile app. Hub sites can also be found on the SharePoint mobile app and are even more discoverable if users follow hub sites.
- From the organization portal. If you have an existing organizational intranet or portal, you can link to your hub sites in your existing navigation.
- On each hub site. Consider adding a link to your organizational portal home page on each hub site. Add the link to the organization portal ("home home") to the far right in your hub navigation to keep the primary focus of your hub site on the hub site context.
- Reaching the right audience for news. Hub sites help you bring news to the right people at the right time and in the right context. News doesn't flow down to associated sites, just up from the associated site to the hub. If you want the broadest reach for your news, publish it to the hub site. To make hub news more visible, you may want to have two news web parts on your home page: one for new published on the hub home and another that includes news rolled up from associated sites (all or just selected sites).
- Hub naming conventions. Think about naming conventions for hub sites to make them more discoverable. Some options include names such as HR Central, HR Hub, HR Portal. Try to choose a consistent naming convention for all hub sites.
- Getting ready to hub. Once you have planned your hubs, you can transform an existing site (preferably a communication site) to become a hub site or create a new site communication site and make it a hub site. Then, you can add and configure the web parts and navigation on the hub site to emphasize the hub capabilities.
- Subsites. Hub sites solve many or most of the use cases for which you previously used subsites. We recommend using hub sites going forward to organize the sites in your intranet. However, subsites will continue to be supported as a classic feature, and we'll add the new team site template as a subsite option
Subscribe to:
Posts (Atom)