Showing posts with label Powerapps. Show all posts

Saturday, 29 December 2018

Performance considerations & Optimize PowerApps


Microsoft is working hard to improve the performance of all apps that run on the PowerApps platform. But you can follow the best practices in this topic to boost the performance of apps that you create.

When a user opens an app, it goes through these phases of execution before showing any user interface:
1.    Authenticates the user - Prompts the user, if that person has never opened the app before, to sign in with credentials for whatever connections the app needs. If the same user opens the app again, that person might be prompted again, depending on the organization’s security policies.
2.    Gets metadata - Retrieves metadata such as the version of the PowerApps platform on which the app runs and the sources from which it must retrieve data.
3.    Initializes the app - Performs any tasks specified in the OnStart property.
4.    Renders screens - Renders the first screen with controls that the app has populated with data. If the user opens other screens, the app renders them by using the same process.


Limit data connections


Don’t connect to more than 30 data sources from the same app. Apps prompt new users to sign in to each connector, so every additional connector increases the amount of time that the app needs to start. As an app runs, each connector requires CPU resources, memory, and network bandwidth when the app requests data from that source.
You can quickly measure your app’s performance by turning on Developer Tools in Microsoft Edge or Google Chromewhile running the app. Your app is more likely to take longer than 15 seconds to return data if it frequently requests data from more than 30 data sources, such as Common Data Service for Apps, Azure SQL, SharePoint, and Excel on OneDrive.

Limit the number of controls

Don’t add more than 500 controls to the same app. PowerApps generates an HTML DOM to render each control. The more controls you add, the more generation time PowerApps needs.
You can, in some cases, achieve the same result and have the app start faster if you use a gallery instead of individual controls. In addition, you might want to reduce the number of control types on the same screen. Some controls (such as PDF viewer, data table, and combo box) pull in large execution scripts and take longer to render.

Optimize the OnStart function

Use the ClearCollect function to cache data locally if it doesn’t change during the user session. Also, use the Concurrent function to load data sources simultaneously.
As this reference topic demonstrates, you can use Concurrent to cut the amount of time an app needs to load data in half.
Without the Concurrent function, this formula loads each of four tables one at a time:

ClearCollect( Product, '[SalesLT].[Product]' );
ClearCollect( Customer, '[SalesLT].[Customer]' );
ClearCollect( SalesOrderDetail, '[SalesLT].[SalesOrderDetail]' );
ClearCollect( SalesOrderHeader, '[SalesLT].[SalesOrderHeader]' )


You can enclose the same formula in the Concurrent function to reduce the overall time that the operation needs:

Concurrent(   
        ClearCollect( Product, '[SalesLT].[Product]' );
        ClearCollect( Customer, '[SalesLT].[Customer]' );
        ClearCollect( SalesOrderDetail, '[SalesLT].[SalesOrderDetail]' );
        ClearCollect( SalesOrderHeader, '[SalesLT].[SalesOrderHeader]' ))
       

Cache lookup data
Use the Set function to cache data from lookup tables locally to avoid repeatedly retrieving data from the source. This technique optimizes performance if the data probably won’t change during a session. As in this example, the data is retrieved from the source once and then referenced locally after that until the user closes the app.

Set(CustomerOrder, Lookup(Order, id = “123-45-6789”));
Set(CustomerName, CustomerOrder.Name);
Set(CustomerAddress, CustomerOrder.Address);
Set(CustomerEmail, CustomerOrder.Email);
Set(CustomerPhone, CustomerOrder.Phone);
Contact information doesn’t change frequently, and neither do default values and user information. So you can generally use this technique with the Defaults and User functions also.

Avoid controls dependency between screens
If a control’s value depends on the value of a control on a different screen, manage the data by using a variable, a collection, or a data-source reference.

Use global variables
To pass the app’s state from one screen to another, create or modify a global variable value by using the Set function instead of by using the Navigate and UpdateContext) functions.

Use delegation
Where possible, use functions that delegate data processing to the data source instead of retrieving data to the local device for processing. If an app must process data locally, the operation requires much more processing power, memory, and network bandwidth, especially if the data set is large.

For example, SharePoint lists support delegation from the Filter function but not the Search function. So you should use Filter instead of Search to find items in a gallery if the SharePoint list contains more than 500 items. For more tips, see Working with large SharePoint lists in PowerApps (blog post).

Use Delayed Load
Turn on the experimental feature for Delayed Load if your app has more than 10 screens, no rules, and many controls that are on multiple screens and that are directly bound to the data source. If you build this type of app and don’t enable this feature, app performance may suffer because the controls in all screens must be populated even on screens that aren’t open. Also, all screens of the app must be updated whenever the data source changes, such as when the user adds a record.

Working with large data sets
Use data sources and formulas that can be delegated to keep your apps performing well while users can access all the information they need, and avoid hitting the data row limit of 2000 for non-delegable queries. For data-record columns on which users can search, filter, or sort data, those indexes of columns are designed well as these docs describe for SQL Server and SharePoint.

Republish apps regularly
Republish your apps (blog post) to get performance improvements and additional features from the PowerApps platform.

What is PowerApps

PowerApps is a service that lets you build business apps that run in a browser or on a phone or tablet, and no coding experience is required.


  • The objective of PowerApps is to enable business users to build new capabilities via apps, without requiring that they have code expertise. Microsoft touts an intuitive visual design for PowerApps, with drag-and-drop functionality and a familiar look and feel taken from applications like PowerPoint.
  • PowerApps has connections to various Microsoft-based and third-party applications, including Microsoft SQL Server, SharePoint and OneDrive in the Office 365 productivity suite, as well as Dropbox, Google Docs, SAP, Oracle and Dynamics CRM.


Can I use PowerApps if I have SharePoint on premises?

  • Yes. PowerApps is a cloud-based tool, so you would need to have your AD connected into Office 365 to assign licenses and use PowerApps. After your users have a license to use PowerApps, you can install an “On-Prem Gateway” on your SharePoint Server and then register it to your Office 365 tenant. You can then use that gateway to access all your information in SharePoint like you normally would in PowerApps.


Can I add conditional logic to a form? (Show and hide columns)

  • Yes. One of the biggest things with InfoPath was the ability to show and hide columns based on rules in the form. PowerApps allows you to add logic to your controls within your forms so you can not only show/hide, but you can also change colors, disabled/enabled, spacing, etc. It’s not the same controls as InfoPath, but PowerApps has been working on their logic within forms to make it easier. After you learn how to add conditional logic into a PowerApp, it is very repeatable and simple.


Can I have a PowerApp replace the normal SharePoint list form?

  • Yes. This feature was announced at Ignite 2017 and will be coming out soon to first release users. This feature will only be available in the modern experience so classic users will not be able to change their forms with PowerApps. If you are using the modern experience for lists, you can go into List Settings->Form Settings-> “Use a custom form in PowerApps”, customize the PowerApp form, and it will automatically save back to the list. Doing this will allow you to have a new and customized view/edit form, just like you would have with InfoPath.


Can I migrate my InfoPath forms to PowerApps?

  • No. Your custom InfoPath forms would have to be remade in PowerApps. It sounds daunting, but with PowerApps’ new tools, you can transform your basic InfoPath form into an efficient PowerApp to streamline your processes.


What if PowerApps is not perfect for you?

  • Just like with InfoPath, PowerApps fits many needs, but sometimes companies cannot use PowerApps or it might not be the best tool for the job. If you are looking for a very similar user experience to InfoPath on both the frontend and backend, I suggest a third-party tool like Nintex. Nintex not only gives you an InfoPath-like interface that some might be used to, but it also allows you to easily create mobile and complex forms.

3 things to know about PowerApps as an InfoPath successor

The wait is over — Microsoft has now designated PowerApps as the successor to InfoPath. On the occasion of PowerApps being released to general availability this week, here’s our take.

1. PowerApps was not intended as an InfoPath replacement but has been pulled into that role

The Original Story
When it was first introduced in November 2015, the SharePoint community lit up with speculation this might be the long-awaited replacement for InfoPath. Microsoft worked to dispel this perception, even to the point of denial. From an early Office dev center blog on PowerApps:
“… you might naturally ask the question whether this is intended as a replacement for InfoPath or SharePoint Designer. It’s a fair question, but the short answer is ‘no.’”
Dan Holme concurred:
“PowerApps does not replace InfoPath and SharePoint Designer. It creates an entirely new class of capability….”
All indications are that PowerApps was not intended as an InfoPath replacement — including the way the word ‘forms’ was so carefully avoided in its roll-out.

The New Story
For the first three quarters of 2016 the silence from Microsoft on InfoPath replacement remained deafening. Then at Ignite 2016 Formotus first started talking about PowerApps as being a successor to InfoPath.
In this interview from Ignite, Microsoft Senior Product Manager Chris McNulty said:
“We’ve talked about ‘we want you to get off InfoPath’ but we never gave you a good answer before. We’ve really learned from that. And now we have the answer, and the answer is PowerApps and Flow. They are the successor to the InfoPath / SharePoint Designer model.”
This week Microsoft announced the general availability of PowerApps and Flow, and at the same time on its SharePoint blog made the most definitive statement to date about these new products being the designated replacements for InfoPath:
“PowerApps and Microsoft Flow are tools for business users to build business applications and automation in SharePoint today and tomorrow. They are the successors to InfoPath and SharePoint Designer for many common business scenarios, especially custom forms used on SharePoint lists.”

2. PowerApps is not a SharePoint-first or browser-first offering

If you aren’t yet familiar with PowerApps, here’s a little background:
  • It is a product of Azure, not SharePoint. It has close ties to Dynamics 365 and an underlying goal of promoting the use of the Common Data Service (aka Common Data Model).
  • Its full-power design tool is a Windows (Win32) application, with a browser-based version being developed after.
  • Its full-featured clients are mobile apps, with browser-based form filling promised on the roadmap.

So PowerApps was invented as a Windows application to design mobile apps that consume Azure services. The idea that it will also be used as a browser-based interface to modern SharePoint lists has been a later development.
There’s an interesting historical parallel here, because InfoPath itself was not originally intended for designing web-based forms for SharePoint. But SharePoint needed such a tool, and InfoPath was ultimately pulled in to fill that role. Now it’s PowerApps’ turn.

3 PowerApps only partially replaces InfoPath

The integration with SharePoint is clearly focused on providing a rich user interface to data in SharePoint lists. While list UI has been a common use for InfoPath in the SharePoint community, it’s important to note that it’s only one of many uses for InfoPath. (In this sense PowerApps might more precisely be called a replacement for FoSL — the Forms on SharePoint Lists project announced in January 2014 and later discontinued.)
Microsoft has clearly been giving caveats. The slide at Ignite read:
“PowerApps is the successor for forms scenarios, but doesn’t seek feature parity with InfoPath.”
Chris McNulty said in his presentation:
“There are some scenarios InfoPath excels at — the offline access, those rich XML document scenarios — these you should continue to use.”
So while Microsoft is developing PowerApps as the new best way to create rich user interfaces for SharePoint lists, they are not promising to replace other scenarios in which InfoPath is commonly used.
InfoPath Scenarios not supported by PowerApps
If you use InfoPath for any of the following scenarios, PowerApps is not recommended, even by Microsoft, as a replacement:
  • Offline scenarios in which InfoPath Filler can be used without an Internet connection.
  • Rich XML document scenarios in which forms can be moved, shared, reopened, edited, or processed for data.
  • Wider audience scenarios in which users outside the organization are filling the forms. PowerApps only supports appropriately licensed users in the same organization.

For these kinds of scenarios, there is no reason to believe that Microsoft will be providing any new alternative to InfoPath, so it’s probably time to get serious about investigating third-party solutions.

Sunday, 15 July 2018

Introduction to MS PowerApps & How to Create them

What are PowerApps?

PowerApps are quick, easy to create applications that will allow users to consume and edit data from multiple different sources. PowerApps allow users to create an App in order to fulfil a business requirement without having any development experience. The Apps have many built in data sources for users to consume and once they have been created they are easy to share with other users via email.


PowerApps is a service for building and using custom business apps that connect to your data and work across the web and mobile - without the time and expense of custom software development.

What data sources can they use?

As mentioned above, there are plenty of built in data sources PowerApps can use, presenting users with a simple interface to select their data source from. Popular data sources are as follows:
  • SharePoint
  • SQL Server
  • Dynamics 365
  • Office 365 Users
  • Office 365 Outlook
  • Excel
  • OneDrive for Business
  • OneDrive
  • Dropbox
A full list of data sources is available at https://powerapps.microsoft.com/en-us/tutorials/connections-list.

How are they Developed?

Power Apps can be developed in one of 2 places:
  • PowerApps Studio for Windows
  • PowerApps Studio for Web
I have been developing on the Web client. The reason for this, to be honest, is that so far I have experienced issues with the Windows studio version. I have read that users have experienced issues with the Windows Studio after installing certain updates on Windows 8.1. This isn’t a big deal for now, PowerApps is a relatively new technology and for the app I have recently created the functionality provided by the web version was more than enough.

Creating a New App

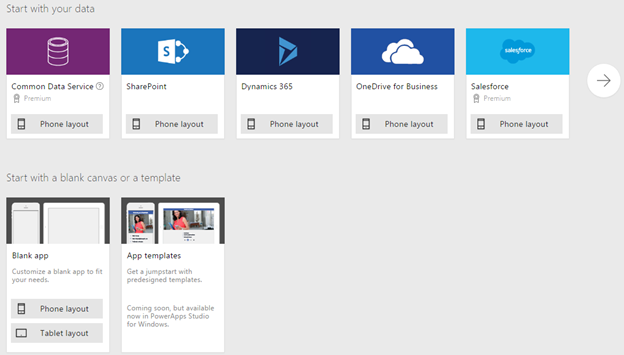
When creating an App from scratch you will be presented with a few options regarding data source and template:
powerapp1
I am going to go with the SharePoint option, but you can choose a template that best suits your data source. You can of course choose the blank template, but this will require a little extra effort to hook up your data source.
Once I select SharePoint it will ask me to select a SharePoint list from one of my site collections, which in this case will act as my data source. I’m going to select my finance site collection:
powerapp2
And then my ‘Expenses’ list:
powerapp3

The Development environment

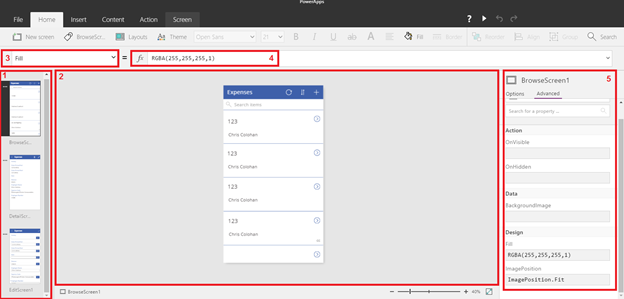
Once the app is created there is a quick tour that comes up. This is only a few steps long and I would advise taking this as it contains some quite helpful information. After the tour you will see the main design screen for the first time:
powerapp4
This has a fairly standard windows look combining the tabbed feel of the Office product suite with the property windows on the left and right hand side that users of Visual Studio will be familiar with.
  1. Screen Thumbnails – This section displays all of the screens that make up the app. Notice that for our new app there are 3 screens already created – a browse screen to display the current list items, an edit screen to edit / add, and a display screen to allow users to view individual items
  2. Design Workspace – This is the main area used to design and make changes to the App’s screens. From here you can highlight various fields and components on the form, as well as adding in new items via the inset tab.
  3. Property Drop down menu – The drop down menu allows you to select the various properties of the highlighted component, whether it be the whole screen or an individual field, and edit the properties of that component. This can range from adding a formula on screen load to changing the font size of a text box.
  4. Formula Bar – Used to add in values or formulas for specific properties or event handlers i.e. updating an items default text, changing the background color of an item when it is highlighted via the OnSelect event handler.
  5. Properties Window – Allows users to view all properties of the highlighted component at once and edit them, as opposed to the property drop down menu which only shows one at a time.

Top Ribbon Options

The Top Ribbon Bar has the following options:
  • File – Standard Office File Menu, options such as save, Open Collections (used to hold global variables), Media (used to upload media files) and Share (used to publish apps, will come back to this later).
  • Home – Provides options to create a new screen, edit a screen, change layout plus the standard options for text editing
  • Insert – Allows users to insert controls onto a page (full list of controls can be found here: https://powerapps.microsoft.com/en-us/tutorials/reference-properties/ )
  • Content – Contains options to add and removed content for Media, Collections and Data Sources.
  • Action – Allows users to perform various actions based on the selected control i.e. visible / hide, remove control.
  • Screen – Provides options to set screen layout, fill and background colour.

Formulas

Once you have added in some fields to the various screens the important functionality is taken care of in the formulas. Here are a few examples:
  • You may want to hide a field based on certain events, here I have added the following formula to the visible property of a control I want to hide when it doesn’t contain a value:
If(IsBlank(Division.Value), false, true)
  • I have added the following filter to the browse screen to ensure users only see their own items:
Filter(Expenses,Employee_x0020_Name = User().FullName)
  • The following ensures the user is redirected to the correct screen when the add / edit a list item:
SubmitForm(EditForm1);Navigate(BrowseScreen1, ScreenTransition.None)
These are just a few examples of how to use the PowerApp functions, there are a lot of them! A full list of functions can be found here: https://powerapps.microsoft.com/en-us/tutorials/formula-reference/.

Publishing Apps

Microsoft refer to this as ‘Sharing’ your app, but you are making it available for other users to use so it’s more like publishing. From the file menu, select ‘Share’, you will be presented with options to add users email addresses to give them access to your app. When giving users access, you will also have the option to add them as a contributor, meaning they can update the app themselves.


Pros:
  • Excel knowledge transfers 
  • No Visual Basic to learn
  • Filter() blows away all the Pivot Tables you would've needed in Excel
  • Flexible Height Gallery and Gallery.WrapCount sets PowerApps apart from Project Siena
  • Universal access--iOS, Android, ANY WEB BROWSER
  • Data can be saved, analyzed, and viewed anywhere--in app or in Excel
  • Ingtegration: Flow allows you to communicate information between multiple services
  • Media can be saved within the app--no hosting needed
  • You can connect to competitors including Dropbox and Google Drive
  • SVG works--there is a lot of unused potential here
  • Regular Joe can build an app: PowerApps is a low-code solution, yet it can also do complicated things if you push it.
  • The PowerApps team has implemented ideas shared by the community.

Cons:
  • You more or less need to sell Office365/PowerApps user plan if you're a developer
  • Apps cannot be placed on the app store like other platforms
  • Apps are only accessible with a Microsoft account; apps are only usable within a domain