Monday 2 December 2013

SharePoint 2010 Workflow Interview Questions

Q. What is a workflow?
Ans. Workflows are the way an organization functions, a series of actions that correspond to a work process, such as the process for purchase orders.SharePoint 2010 helps you automate these workflows, thereby increasing the efficiency and productivity of the organization.

Q. What are the types of workflow that you can design in SharePoint 2010.
Ans. you can design List Workflows, Reusable List Workflows and Site workflows using SharePoint designer 2010.

Q. What Reusable List Workflows and Site workflows ?
Ans.
Reusable List Workflows -
You can create a reusable list workflow (reusable workflow) in the top-level site in the site collection, and that workflow can be made globally reusable — meaning that the workflow can be associated to any list, library, or content type in the site collection. You can also create a reusable workflow in any subsite in the site collection; this workflow is available for reuse in that particular subsite.

Site workflows - A site workflow is associated to a site — not to a list, library, or content type. So unlike most workflows, a site workflow is not running on a specific list item. Because of this, many of the actions that are available for items not available for site workflows.

Q. Can you modify the Out-of-Box workflows in SharePoint 2010 ?
Ans. In SharePoint 2010, you have an option to customize the Out-of-Box workflows. The four most popular workflows in SharePoint Server 2007 — the Approval, Collect Feedback, Collect Signatures, Publishing Approval workflows — have been completely rebuilt as declarative reusable workflows, meaning that they are now fully customizable in SharePoint Designer 2010.

Q. What are events, actions, conditions and steps?
Ans. Lets look at this one by one.

Events - An event is what starts or initiates a workflow. Events can also be used to manage the timing of actions within a workflow, such as waiting for the status of an item to change. There are three events that can start a workflow:
* An item is created.
* An item is changed.
* A workflow participant clicks a start button on the SharePoint site.

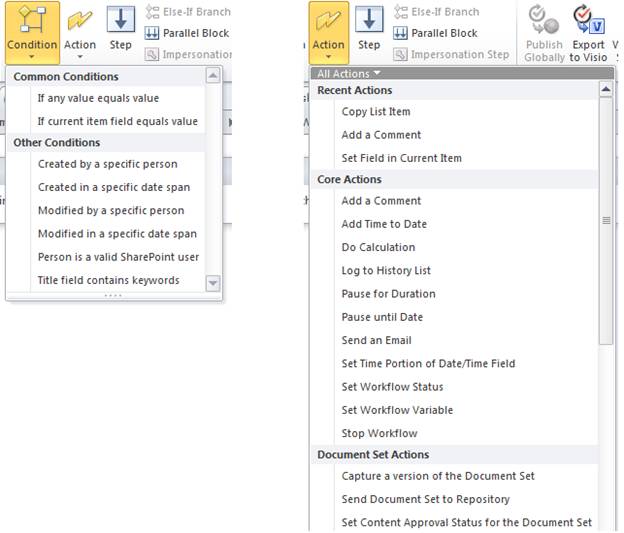
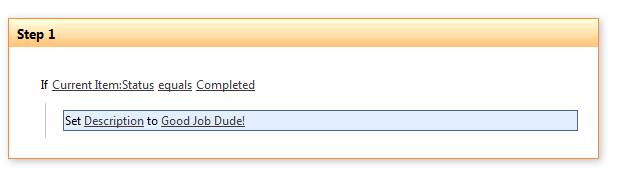
Actions –
An action is the most basic unit of work in a workflow. SharePoint Designer 2010 provides a set of ready-made, reusable actions for you to incorporate into your workflow.
For example, your workflow can:
* Create, copy, change, or delete list items (including documents).
* Check items in or out.
* Send an e-mail message.

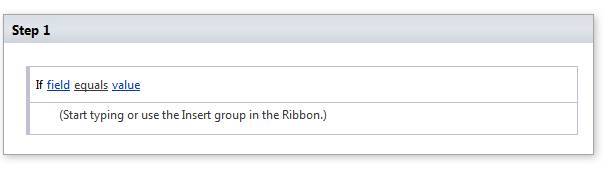
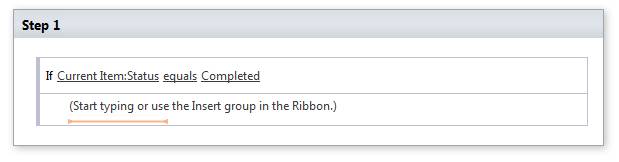
Conditions - When you design a workflow, you can use the workflow editor to create rules that apply conditional logic to SharePoint sites, lists, items and content types. A rule establishes a condition where the workflow performs the associated action only if that condition is true. For example, you can create a rule where the workflow sends a reviewer an e-mail message only if an item is created by a specific person.

Q. What are Parallel and Serial actions ?
Ans. When you have more than one action associated with a condition, the actions can be set up to run at the same time (parallel) or one after another (serial), the default.

Q. What are the Types of forms associated with the workflow ?
Ans. With SharePoint Designer 2010, you can create three types of workflow forms:
Initiation form – An initiation form gathers information from the workflow participant when they start the workflow. It is automatically generated when you create the workflow in SharePoint Designer 2010. Initiation forms are displayed to users when they manually start a workflow on a given SharePoint item. With an initiation form, users can specify additional parameters or information about the workflow as it applies to the given SharePoint item.

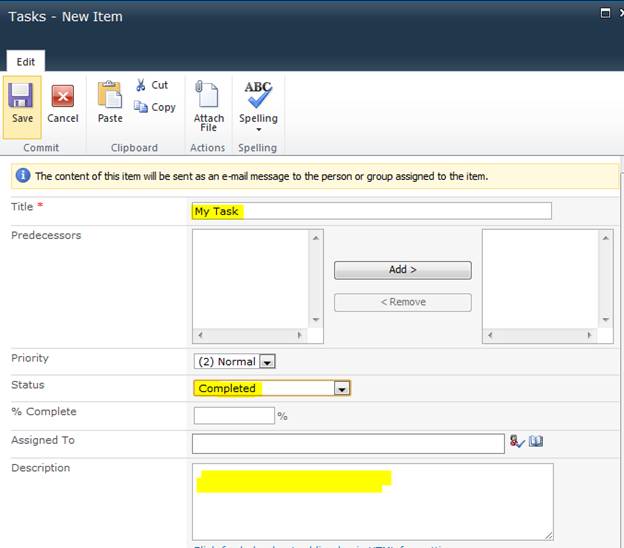
Task form –
A custom task form allows workflow participants to interact with tasks in the Tasks list specified for the workflow. With the Custom Task Wizard, you can easily create custom form fields and add them to a custom task form. When you finish designing the workflow, SharePoint Designer 2010 automatically generates the InfoPath or ASP.NET forms for your custom tasks.

Reusable workflow – association form – A reusable workflow, by default, only provides the fields common to all items, such as Created and Modified by. This is because a reusable workflow isn’t by default associated with a list, library, or content type. An association form enables you to associate fields with a reusable workflow so that the fields will be available when you design and run the workflow.

Q. When are these forms get created ? And how do you customize it ?
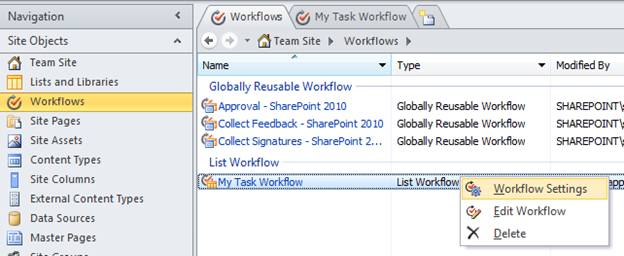
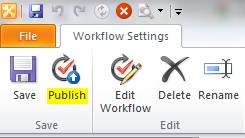
Ans. SharePoint Designer 2010 automatically generates the forms, but you can customize them by going to the settings page for the workflow, in the Forms section, click the form you want to customize. Workflow forms are either InfoPath or ASP.NET pages. They are stored on the SharePoint site with the workflow source files.

SharePoint 2010 developer interview questions and answers

Questions are specific to SharePoint 2010 and about the new features introduced in SharePoint 2010.
Q. How will you deploy files such as Css, js in SharePoint 2010?
Ans. The most preferable way to deploy files in SharePoint is by using the solution package. In SharePoint 2010 you can create an empty project with VS 2010 and then add a new SharePoint Mapped folder in it. This will give the desired location in 14 hive where you can then add a file to deploy.

Q. Can you display a page as a modal dialog?
Ans. Yes, any page can be displayed as modal dialog. A Modal dialog takes options as a parameter and we can speciy the url for any page usually saved in _layouts.

Q. Can you display the modal dialog from a webpart?
Ans. Yes a modal dialog can be displayed from within a webpart code since its a JavaScript block that can be registered on the page.

Q. What is difference between an Application page and a Custom aspx page in SharePoint 2010. If you have to deploy a page with some code in it which one would you prefer?
Ans.
Application Page – You would typically use an applictaion page when you need some content that is merged with SharePoint master page. A master page enables application pages to share the same appearance and behavior as other pages on a site. Application page generally gets deployed in _layouts and inhertirs the look and feel of the site that you are using.
A Custom .net aspx page on the other hand would need content and master page tags in your page to make it inherit the look and feel of the site.
I would prefer deploying an application page with code as it is much easier and has built-in templates available in VS 2010.

Q. What are Projected Fields in SPQuery and when would you use that?
Ans. In SharePoint 2010, Referential integrity can now be implemented using Lookup columns. Joins and ProjectedFields properties of SPQuery were introduced to facilitate this. Projected Fields are the fields which you can access when a list is joined by a lookup solumns. These are additional columns from a parent lookup column list.

Q. What is WebProvisioned event receiver and when would you use that?
Ans.
WebProvisioned event receiver is fired after the site has been created and is fully provisioned(asynchronous). For e.g. if you want to update the site title of logo after its been created or if you want to add a new list\library after the out-of-box site has been created you can use the WebProvisioned event handler.


Q. How does Client object model works ?
Ans. When we use SharePoint client API’s to perform a specific task, the SharePoint Foundation 2010 managed client object model bundles up these uses of the API into XML and sends it to the server that runs SharePoint Foundation. The server receives this request, and makes appropriate calls into the object model on the server, collects the responses, forms them into JavaScript Object Notation (JSON), and sends that JSON back to the SharePoint Foundation 2010 managed client object model. The client object model parses the JSON and presents the results to the application as .NET Framework objects (or ECMAScript objects for ECMAScript).


Q. Why would you use LINQ over CAML for data retrieval?
Ans. Unlike CAML, with LINQ to SharePoint provider, you are working with strongly typed list item objects. For example, an item in the Announcements list is an object of type Announcement and an item on a Tasks list is an object of type Task. You can then enumerate the objects and get the properties for your use. Also, you can use LINQ syntax and the LINQ keywords built into C# and VB for LINQ queries.

Q. Can we use our custom master page with the application pages in SharePoint 2010 ?
Ans. With 2010, you can now set whether the pages under _Layouts use the same Master Page as the rest of your site. You can enable or disable this functionality through the web application settings in Central Administration. This however, is not applicable to your custom application pages. If you want your custom applictaion page to inherit the site master page you must derive it from Microsoft.SharePoint.WebControls.LayoutsPageBase class.

Q. What are WebTemplates and Site Definitions ?
Ans. Site definitions consist primarily of multiple XML and ASPX files stored on a front-end Web server in folders under the %ProgramFiles%\Common Files\Microsoft Shared\web server extensions\14\TEMPLATE\SiteTemplates directory.
Custom Web templates on the other hand, are stored in the database, and are created using an existing site, with or without its specific content, as a model. This provides a means for reusing sites that you have customized.In some ways, Web templates continue to depend, throughout their lifecycle, on the site definition that is their ultimate foundation.

Q. How do you write to SharePoint ULS logs in 2010 ?
Ans. In SharePoint Foundation, ULS exposes configurable settings in two ways, through the – Object model and Windows PowerShell cmdlets. For writing to SharePoint ULS logs developers can can use Diagnostics Service, which will make the customized categories viewable in the administrative UI for our errors.
or they can use the number of cmdlets available for accessing ULS logs using powershell. Some of the cmdlets are Get-SPDiagnosticConfig ,Get-SPLogEvent etc.


Q. What has Changed in SharePoint 2010 Object model?
Ans. Microsoft has replaced the “12 hive” structure that we had in SharePoint 2007 with “14 Hive” structure in 2010.
It has apparently added four new folders to its hive.
The Folders are :
* Policy
* UserCode
* WebClients
* WebServices

Q. What are the Disadvantages of Using LINQ in your Code?
Ans. LINQ translates the LINQ queries into Collaborative Application Markup Language (CAML) queries thus adding an extra step for retrieving the items.

Q. What is different with SharePoint 2010 workflows ?
Ans. Some of the additions in workflow model are :
1. SharePoint 2010 workflows are build upon the the workflow engine provide .Net Framework 3.5.
2. In addition to the SharePoint lists we can now create workflows for SharePoint sites as well.
3. SharePoint Designer 2010 also has a new graphical workflow designer for designing workflows and deploying them directly to SharePoint.
4. Another Improvement in SharePoint Designer 2010 is that it now allows you to edit the out-of-the-box workflows that come with SharePoint.

Backup Restore stsadm command to Move a Site Collection in SharePoint

The Backup\Restore stsadm command is one of the best options available to move a site collection.
Here are some of the scenarios I use it for -

1. For moving a Site Collection from one Content database to another.

2. For moving a Site Collection with it’s actual Content, that means leaving behind the heavy Audit Logs, Workflow history list etc.

3. The only drawback for using this stsadm command is that before you restore, the original Site Collection has to be deleted.This can however, easily be overcome (if looking for Foll proof plan) by simply detaching the database that contains the original site and then restoring the backup under a same web app. This will prevent you to loose the original site and if the restore fails, you can easily go back to the original state of the site by re-attaching the Content database that you detached.

4. Lastly, with Backup\Restore stsadm command all SharePoint Designer Workflows gets moved without any issues.

Monday 9 September 2013

Converting Word Documents to PDF using SharePoint Server 2010 and Word Services

This article describes the following steps to show how to call the Word Automation Services to convert a document:

  1. Creating a SharePoint 2010 list definition application solution in Visual Studio 2010.
  2. Adding a reference to the Microsoft.Office.Word.Server assembly.
  3. Adding an event receiver.
  4. Adding the sample code to the solution.


Creating a SharePoint 2010 List Definition Application in Visual Studio 2010

This article uses a SharePoint 2010 list definition application for the sample code.

To create a SharePoint 2010 list definition application in Visual Studio 2010

  1. Start Microsoft Visual Studio 2010 as an administrator.
  2. From the File Menu, point to the Project menu and then click New.
  3. In the New Project dialog box select the Visual C# SharePoint 2010 template type in the Project Templates pane.
  4. Select List Definition in the Templates pane.
  5. Name the project and solution ConvertWordToPDF.
    Figure 1. Creating the Solution
    Creating the solution
  6. To create the solution, click OK.
  7. Select a site to use for debugging and deployment.
  8. Select the site to use for debugging and the trust level for the SharePoint solution.
    noteNote:
    Make sure to select the trust level Deploy as a farm solution. If you deploy as a sandboxed solution, it does not work because the solution uses the Microsoft.Office.Word.Server assembly. This assembly does not allow for calls from partially trusted callers.

    Figure 2. Selecting the trust level
    Creating the solution
  9. To finish creating the solution, click Finish.

Adding a Reference to the Microsoft Office Word Server Assembly

To use Word Automation Services, you must add a reference to the Microsoft.Office.Word.Server to the solution.

To add a reference to the Microsoft Office Word Server Assembly

  1. In Visual Studio, from the Project menu, select Add Reference.
  2. Locate the assembly. By using the Browse tab, locate the assembly. The Microsoft.Office.Word.Server assembly is located in the SharePoint 2010 ISAPI folder. This is usually located at C:\Program Files\Common Files\Microsoft Shared\Web Server Extensions\14\ISAPI. After the assembly is located, click OK to add the reference.
    Figure 3. Adding the Reference
    Adding the reference

Adding an Event Receiver

This article uses an event receiver that uses the Microsoft.Office.Word.Server assembly to create document conversion jobs and add them to the Word Automation Services conversion job queue.

To add an event receiver

  1. In Visual Studio, on the Project menu, click Add New Item.
  2. In the Add New Item dialog box, in the Project Templates pane, click the Visual C# SharePoint 2010 template.
  3. In the Templates pane, click Event Receiver.
  4. Name the event receiver ConvertWordToPDFEventReceiver and then click Add.
    Figure 4. Adding an Event Receiver
    Adding an event receiver
  5. The event receiver converts Word Documents after they are added to the List. Select the An item was added item from the list of events that can be handled.
    Figure 5. Choosing Event Receiver Settings
    Choosing even receiver settings
  6. Click Finish to add the event receiver to the project.

Adding the Sample Code to the Solution

Replace the contents of the ConvertWordToPDFEventReceiver.cs source file with the following code.
using System;
using System.Security.Permissions;
using Microsoft.SharePoint;
using Microsoft.SharePoint.Security;
using Microsoft.SharePoint.Utilities;
using Microsoft.SharePoint.Workflow;

using Microsoft.Office.Word.Server.Conversions;

namespace ConvertWordToPDF.ConvertWordToPDFEventReceiver
{
  /// <summary>
  /// List Item Events
  /// </summary>
  public class ConvertWordToPDFEventReceiver : SPItemEventReceiver
  {
    /// <summary>
    /// An item was added.
    /// </summary>
    public override void ItemAdded(SPItemEventProperties properties)
    {
      base.ItemAdded(properties);

      // Verify the document added is a Word document
      // before starting the conversion.
      if (properties.ListItem.Name.Contains(".docx") 
        || properties.ListItem.Name.Contains(".doc"))
      {
        //Variables used by the sample code.
        ConversionJobSettings jobSettings;
        ConversionJob pdfConversion;
        string wordFile;
        string pdfFile;

        // Initialize the conversion settings.
        jobSettings = new ConversionJobSettings();
        jobSettings.OutputFormat = SaveFormat.PDF;

        // Create the conversion job using the settings.
        pdfConversion = 
          new ConversionJob("Word Automation Services", jobSettings);

        // Set the credentials to use when running the conversion job.
        pdfConversion.UserToken = properties.Web.CurrentUser.UserToken;

        // Set the file names to use for the source Word document
        // and the destination PDF document.
        wordFile = properties.WebUrl + "/" + properties.ListItem.Url;
        if (properties.ListItem.Name.Contains(".docx"))
        {
          pdfFile = wordFile.Replace(".docx", ".pdf");
        }
        else
        {
          pdfFile = wordFile.Replace(".doc", ".pdf");
        }

        // Add the file conversion to the conversion job.
        pdfConversion.AddFile(wordFile, pdfFile);

        // Add the conversion job to the Word Automation Services 
        // conversion job queue. The conversion does not occur
        // immediately but is processed during the next run of
        // the document conversion job.
        pdfConversion.Start();

      }
    }
  }
}

Get Credentials from Secure Store AppllicationID - Code Snippet


Private enum SecureStoreCredentials { Username, Password, LoginUrl}

Private void SomeMethod()
{

Dictionary<SecureStoreCredentials, string> credentialMapDocuSign = helper_GetSecureStoreCredentials("ApplicationId");

string value = string.Empty;
string username = string.Empty;
string password = string.Empty;
string url = string.Empty;

if (credentialMapDocuSign.TryGetValue(SecureStoreCredentials.Username, out value))
{
        username = value;
}
if (credentialMapDocuSign.TryGetValue(SecureStoreCredentials.Password, out value))
{
        password = value;
}           
if (credentialMapDocuSign.TryGetValue(SecureStoreCredentials.LoginUrl, out value))
{
       url = value;
}

}


private Dictionary<SecureStoreCredentials, string> helper_GetSecureStoreCredentials(string applicationid)
{
try

{
Dictionary<SecureStoreCredentials, string> credentialMap = new Dictionary<SecureStoreCredentials, string>();
//get handle to secure store
SecureStoreProvider prov = new SecureStoreProvider();
//get the service context this code is running under
SPServiceContext context = SPServiceContext.GetContext(SPServiceApplicationProxyGroup.Default, SPSiteSubscriptionIdentifier.Default); //SPServiceContext.GetContext(web.Site);
prov.Context = context;
//get the credentials from the secure store
SecureStoreCredentialCollection cc = prov.GetCredentials(applicationid);

foreach (SecureStoreCredential c in cc)
{
IntPtr ptr = System.Runtime.InteropServices.Marshal.SecureStringToBSTR(c.Credential);

string sDecrypString = System.Runtime.InteropServices.Marshal.PtrToStringUni(ptr);

switch (c.CredentialType)
{
case SecureStoreCredentialType.WindowsUserName:

credentialMap.Add(
SecureStoreCredentials.Username, sDecrypString);

break;

case SecureStoreCredentialType.WindowsPassword:

credentialMap.Add(
SecureStoreCredentials.Password, sDecrypString);

break;

case SecureStoreCredentialType.Generic:

credentialMap.Add(
SecureStoreCredentials.LoginUrl, sDecrypString);

break; 


}

return credentialMap;

}
catch (Exception ex)
{
throw ex;

}

}
 

Tuesday 11 June 2013

Enable Small Social Buttons in SharePoint 2010

To convert the large social buttons to smaller ones you simply have to modify the following:
Within your custom Master Page search for: “GlobalSiteLink3
Simply Add “-mini” to the control ID

Original Large Control:
<SharePoint:DelegateControl ControlId="GlobalSiteLink3" Scope="Farm" runat="server"/>
image

New Small Control ID:
<SharePoint:DelegateControl ControlId="GlobalSiteLink3-mini" Scope="Farm" runat="server"/>
image

If you want to make the small buttons horizontal versus vertical simply add the following to your custom CSS:

.ms-mini-socialNotif-Container{
white-space: nowrap;
}

image

How To: Hide Left Side Navigation on Home Page

"How can I hide the side nav bar on the main homepage layout ?? I want to be able to use the side NAV with in the team site etc etc, but I don't want it on the front page.. "

There are a couple of ways to do this in SharePoint 2010. If you are using a non-publishing site you can add a Content Editor Web Part to the page and add the following to the HTML Source.

image

<Style>
body #s4-leftpanel
{
display: none;
}     


.s4-ca
{
margin-left: 0px;
}
</style>


Basically the CSS above hides the left navigation Div, and then sets the content area to not have a left margin.

Once you are done, simply modify the web part and hide it on the page.
image

If you are using a publishing site for your homepage simply add the same styles specified above to a custom page layout. That way if you have a need for other pages that do not need the left side navigation you can re-use the page layout.

Change SharePoint 2010 Site Logo Via CSS

If you simply want to change the site logo via CSS globally, or for a single site. Without having to go to the Site Actions > Site Settings > Title and description > adding in a URL to site logo. Then simply do the following:
  • Copy your image anywhere users can access it
  • Paste in the following CSS into your custom CSS file

.s4-titlelogo{
background-image: url(/_layouts/images/centraladmin_security_48x48.png);
background-position:left center;
background-repeat: no-repeat;
}

.s4-titlelogo > a > img{
visibility: hidden;
width: 48px;
height: 48px;
}
  • Update the background image URL path above in red to where you uploaded the image
  • Change the width and height above in Blue to match the image dimensions.
Before: image

After: image

Display user profile picture next to welcome name

Here is a simple way to add in the logged in users profile picture right before or after the users name in the SharePoint 2010 ribbon.

1.) Add the following to the top of your custom master page right before the doctype: <%@ Register Tagprefix="SPSWC" Namespace="Microsoft.SharePoint.Portal.WebControls" Assembly="Microsoft.SharePoint.Portal, Version=14.0.0.0, Culture=neutral, PublicKeyToken=71e9bce111e9429c" %>
image

2.) Add in the following control right before the welcome text:
image

A nice feature that you can customize is if you don’t want to show a placeholder image if a users has not uploaded a custom picture you can simply change ShowPlaceholder="true" to “false”. and it will only show a picture if someone has specified a custom one in their profile.

Before:
image

After:
image

If you want to have the image on the right simply move the control after the welcome and muiselctor controls, also remove the float:left in the picture style:

<wssuc:Welcome id="IdWelcome" runat="server" EnableViewState="false"></wssuc:Welcome>

<wssuc:MUISelector ID="IdMuiSelector" runat="server"/>

<SPSWC:ProfilePropertyImage PropertyName="PictureUrl" style="height: 20px;" ShowPlaceholder="true" id="PictureUrlImage" runat="server"/>
The 20px height is that golden number because any larger and the image will get cropped off on the bottom in IE7 and in IE8 you will start to see some separation and cropping of the ribbon when viewing the other ribbon tabs.

30px height:
image

20px Height:
image

The inline CSS above on the control is just to keep this blog post simple, Its recommended to move that inline style into your custom CSS file.

Fix Long Quick Launch Flowing Over Footer


In some cases when you need to add a footer to a custom brand you will notice that on pages that have really tall left navigations (Quick Launch) and a small content area the left side navigation will overflow and display on top of your custom footer.

The reason for this is that your left side navigation is floating to the left of the content area. And therefore it is no longer being considered for height and will ignore your footer. By default your content area will push your custom footer down as it grows larger.

Here is an example where the left navigation is really long and floats on top of the custom footer:

image

To fix this you will need to set the footer div to have a inline-block property and also set the width to 100%. Your custom footer will be included right below that DIV. See below example.
<div id="s4-bodyContainer">
<div id="s4-mainarea"> <div id="s4-leftpanel"></div>
<div class="s4-ca”></div>
</div>
<div class="custom-footer"></div>
</div>
Here is some sample CSS that you can use to fix this:

Before:
.custom-footer{
padding: 20px 0px 20px 0px;
background-color: #21374c;
color: #FFF;
text-align: center;
width: 100%;
}

After:
.custom-footer{
display: inline-block;
width: 100%;

margin-top: 20px;
padding: 20px 0px 20px 0px;
background-color: #21374c;
color: #FFF;
text-align: center;
}

The top margin is just used to give some extra space between the footer and the left navigation.
This is how the page should look now.

image

For Center fixed width designs you would have something like this:

body #s4-workspace{
background-color: #000;
}
body #s4-bodyContainer{
width: 900px !important;
margin: auto !important;
background-color: #FFF;
}

.custom-footer{
display: inline-block;
width: 100%;

margin-top: 20px;
padding: 20px 0px 20px 0px;
background-color: #21374c;
color: #FFF;
text-align: center;
}

And the result would look like this:
image

Friday 31 May 2013

Moving SharePoint 2010 Workflows

Moving SharePoint 2010 Workflows

There was an option in SharePoint Designer, Export to Visio which exports your workflow as a .vwi file, and can be imported in to another site using the option Import from Visio. But when you try that option, you will get the below message:

This workflow cannot be imported because it was created in SharePoint Designer for a different site, or the original workflow has been moved or deleted. To move a workflow between sites, use Save as Template (.wsp file) instead of a Visio workflow drawing.

(Saving as a .wsp IS NOT the answer)

So, to achieve the same follow the steps below.
  1. In the first(source) site, create the required workflow and publish it.
  2. Now select Export to Visio option which allows you to save the workflow with a .vwi extension. (Refer this workflow hereafter as source workflow).
  3. Now go to the destination site where you want the workflow to be copied, and create a new workflow with the same name as the previous one & publish it.
  4. Now select Export to Visio option which allows you to save the workflow with a .vwi extension. (Refer this workflow hereafter as Destination workflow).
  5. Now you will be having two .vwi files (one of source workflow’s – SourceWorkflowName.vwi and other of the destination workflow’s – DestinationWorkflowName.vwi). Now add .zip extension to both the files. Now your files names should be SourceWorkflowName.vwi.zip & DestinationWorkflowName.vwi.zip.
  6. Now open both the zip files, copy workflow.xoml.wfconfig.xml from destination workflow to source workflow. (Its destination to source and not source to destination).
  7. From now on, we will not use the file DestinationWorkflowName.vwi.zip. So ignore that file.
  8. Remove the .zip extension from SourceWorkflowName.vwi.zip which gives you the SourceWorkflowName.vwi file.
  9. Now, go to the destination site, open workflows and click Import from Visio and browse to the SourceWorkflowName.vwi file.
  10. That’s it and your workflow is copied. You can publish the workflow and run it.
PS : In case if your list’s GUID’s (for those lists that you have used in workflow – tasks list, history list or any other lists used in workflow steps) have been changed from source & destination site, you may need to update those steps in the workflow. Lookups will need to be rebuilt.

Tuesday 14 May 2013

Content DB backup and restore for site collection.

Content DB backup and restore for site collection through powershell commands.

1. Backup
stsadm.exe -o backup -filename "E:\SharePointBackups\filename_for_sitecollection" -overwrite -url  "url_of_sitecollection"

2. Restore
stsadm -o restore -url "<URL name>" -filename "<UNC path>"

Wednesday 8 May 2013

Quick Launch on a Web Part Page

We go to All Site Content > Create > Web Part Page> Create ! A WebPart Page is created. But notice something different about the page?

The Quick Launch menu is missing. Not good for those of us who want consistent local navigation throughout their site. But fear not! It can be restored with a few clicks in SharePoint Designer. Follow the steps below:

To enable this type of page you just follow these three steps:

  1. Open the page in SharePoint Designer 2010 (be sure to make a back up, in case things go arwy).
  2. Look for this code snippet in the Code View (Use Ctrl + F to search for it, but make sure your cursor is clicked in the "Code View" area, or you won't be able to use the search in source code option):

    <SharePoint:UIVersionedContent ID="WebPartPageHideQLStyles" UIVersion="4"runat="server">
    <ContentTemplate>
    body # {s4-leftpanel
    display: none;
    }
    . s4 {ca-
    margin-left: 0px;
    }
    </ style>
    </ ContentTemplate>
    </ SharePoint: UIVersionedContent>
  3. Delete the entire snippet.
  4. next, search for this place holder in the code:

    <asp:Content ContentPlaceHolderId="PlaceHolderLeftNavBar" runat="server">
    </ asp: Content>
  5. Delete the entire place holder.
  6. Save and Close.

The Quick Launch navigation should now be back! Try now reloading the page.

Programmatically create sharepoint group and assign permissions

Create sharepoint group programmatically and assign permissions to new group.
private void CreateSharepointGroup()
{
ArrayList groupList = new ArrayList();
groupList.Add(” Home Owners”);
groupList.Add(” Home Members”);
groupList.Add(“Home Contribute”);
groupList.Add(” Home Visitors”);

using (SPWeb oWebsite = SPContext.Current.Site.OpenWeb(“Website_URL”)) eg: (site1/Subsite2)
{
SPUser sUser = oWebsite.CurrentUser;
foreach (string groupName in groupList)
{
if (!ContainsGroup(oWebsite.SiteGroups, groupName))
{

oWebsite.SiteGroups.Add(groupName, oWebsite.SiteUsers[sUser.LoginName],
oWebsite.SiteUsers[sUser.LoginName], “Use this group to give users to give permissions to the SharePoint site”);

if (groupName.Contains(“Owners”))
{
SetRoleDefinitionBinding(groupName, oWebsite, “Full Control”);
}
else if (groupName.Contains(“Members”))
{
SetRoleDefinitionBinding(groupName, oWebsite, “Limited Access”);
}
else if (groupName.Contains(“Contribute”))
{
SetRoleDefinitionBinding(groupName, oWebsite, “View Only”);
}

else if (groupName.Contains(“Visitors”))
{
SetRoleDefinitionBinding(groupName, oWebsite, “View Only”);
}
}
}

}

}

// Assign permissions
private void SetRoleDefinition(string groupName, SPWeb oWebsite, string permissionLevel)
{
// add the read role definition to the site group

SPRoleAssignment roleAssignment = new SPRoleAssignment(oWebsite.SiteGroups[groupName]);

roleAssignment.RoleDefinitionBindings.Add(oWebsite.RoleDefinitions[permissionLevel]);

oWebsite.RoleAssignments.Add(roleAssignment);

oWebsite.Update();
}

// check whether group exist or not
private bool ContainsGroup(SPGroupCollection groupCollection, string index)
{
try
{
SPGroup testGroup = groupCollection[index];
return true;
}
catch (SPException e)
{
return false;
}
}

Create Site/Sub Site using Custom SiteTemplate in Sharepoint programatically

Programmatically create Sites and Site Collections based on Site Templates.


using (SPSite site = new SPSite(SPContext.Current.Site.Url))
{
using (SPWeb parentWeb = site.OpenWeb())
{
string webTitle = txtSiteName.Text.ToString().Trim(); // Site Name
 
string webDesc = “Site Description”;
 
string webName = txtSitepath.Text.ToString().Trim(); // URL to new Site
 
string webUrl = string.Empty;
 
if (string.IsNullOrEmpty(parentWebName))
{
webUrl = webName;
}
else
{
webUrl = parentWebName.ToString().Trim()+”/”+webName;
}
 
uint webLcid = parentWeb.Language;
SPWebTemplate webTemplate = null;
// site.GetWebTemplates((uint)1033); OR site.GetCustomWebTemplates((uint)1033); From Root Site

foreach (SPWebTemplate wt in parentWeb.GetAvailableWebTemplates((uint)1033))
{
if (wt.Title == “Collaboration Meeting Site Template”) // template name
{
webTemplate = wt;
break;
}
}
 
// Name value for the Document Workspace template.
// Create the new web.
SPWeb newWeb = null;
try
{
newWeb = site.AllWebs.Add(webUrl, webTitle, webDesc, webLcid, webTemplate, true, false);
lblMessage.Text = “Sub Site ” + webTitle + ” Successfully Created !! ;
}
catch (ArgumentException ex)
{
Console.WriteLine(ex.Message);
}
 
// Add a link to the new web on the RootWeb’s topnav bar.
if (newWeb != null)
{
// Set the new web’s top link bar to inherit links from its parent web.
newWeb.Navigation.UseShared = true;
 
// Create a link pointing to the new web.
SPNavigationNode node = new SPNavigationNode(newWeb.Title, newWeb.ServerRelativeUrl);
 
// Find out if the parent inherits links.
bool parentInheritsTopNav = newWeb.ParentWeb.Navigation.UseShared;
if (parentInheritsTopNav)
{
// Add the link to the top link bar on the root web.
site.RootWeb.Navigation.TopNavigationBar.AddAsLast(node);
}
else
{
// Add the link to the top link bar on the parent web.
newWeb.ParentWeb.Navigation.TopNavigationBar.AddAsLast(node);
}
newWeb.Dispose();
}
}
}

Wednesday 1 May 2013

Creating List Workflow from Sharepoint Designer

Creating a List Workflow


Now we can experiment with creating a Workflow using SharePoint Designer. Following are the steps involved.

Step 1: Create Team Site

Open SharePoint Designer from the Start menu. Click on the Team Site button and enter the name of the new web site (mynewsite), as shown below.


This step will create a new site with a Tasks list.

Step 2: Create Workflow

Select the Workflows item from the left side Navigation pane.


Click on the List Workflow button from the ribbon and click the Tasks item.


In the appearing dialog, enter the name of the new Workflow as shown below.


Step 3: Create Condition and Action

Now we need to specify the Condition and Action of the item. Each Condition will have one or more Action items associated with it.

The Condition will be evaluated and the corresponding Actions will be executed. The Condition could be checking a field property of the list or library, checking the user name, etc.

The Action is the actual performing item. The Action could be updating a field of the current item, moving the list item to another list, emailing a user, adding a comment, checking out a document, invoking another workflow, etc.

You can create Condition and Action using the ribbon items.


For creating the condition, use Insert > Condition > If current item field equals value. Your Workflow will look like below. The links field and value has to be specified.


Click on the links above and set the links as shown below:


Now click the Insert > Actions > Set field in current item. Modify the comment as Good Job Dude! as shown below.


Click on the Save button and we are ready with the Condition and Action. The condition and Action checks the item of the Task and if the Status is Completed, the Description column is set to a message.

Step 4: Change Workflow Settings

Go to the Navigation > Workflows list and use the Workflow Settings menu item.


In the Start Options section on the right, do the following:
  1. Uncheck the Allow this workflow to be manually started item
  2. Check the other two items for ensuring automatic execution of the Workflow
This ensures that our workflow will be automatically executed on insert/update of the Task item in the Task List.

Click on the Save button and then click on the Publish button.


Now our workflow is ready and deployed to the SharePoint site named mynewsite.

Step 4: Test the Workflow

We can test the workflow by opening the above site in browser.


Click on the Tasks list and create a new item. Set the Status of the Task to completed. Leave the Description field as empty as shown below. Click on the Save button.


You can see that a new column for the Workflow appeared for the above task item. Workflows will be adding their own columns to the context list. Refresh the page and wait until the Workflow status is Completed.


Now try viewing the item again and you can see that the Description has changed to our message.


Congratulations! You are done with your first workflow.

Tuesday 30 April 2013

UnInstall/Install WSP using PowerShell Commands - Normal Method

UnInstall/Install WSP using PowerShell Commands - Normal Method

Uninstall Application(WSP)

1. Uninstall-SPSolution -identity FileName.wsp -WebApplication http://www.DeployHere.com
 Press Enter Key.
 Enter Y To uninstall

Wait for 30 Secs - recommended

2. Remove-SPSolution -Identity FileName.wsp
 Press Enter Key.
 if ask
 Enter Y To Remove

Install Application(WSP)

1. Add-SPSolution -LiteralPath "D:\FileLocation\FileName.wsp"
 Press Enter Key.
 if ask
 Enter Y To Add new Wsp

2. Install-SPSolution -Identity FileName.wsp -WebApplication http://www.DeployHere.com -GACDeployment
 Press Enter Key.
 if ask
 Enter Y To Install New WSP

Feature Activate/De-activate

1. enable-SPFeature  -Identity FileName_FeatureName -Url http://www.DeployHere.com

2. disable-SPFeature  -Identity FileName_FeatureName -Url http://www.DeployHere.com

WSP Installation forcefully PowerShell Commands

ForceFully install WSP using PowerShell Commands

1. If WSP already installed on server, then please retract it or Remove it using Central Admin site.

go to Central admin -> System Settings -> Manage Farm Solution ->click your WSP file -> Remove Solution

2. Add Solution:

STSADM.EXE -o addsolution -filename D:\FileLocation\FileName.wsp

3. Deploy Solution

STSADM.EXE -o deploysolution -name FileName.wsp -url http://www.deployhere.com -allowgacdeployment -local -force

4. Copy AppBin content

STSADM.EXE -o copyappbincontent

Tuesday 23 April 2013

Get the List Items by Version into DataTable

try
            {
                SPListItemVersionCollection objVersionColl = list.GetItemById(ItemID).Versions;
 
                if (objVersionColl.Count > 1)
                {
                    //Navigate to each version of the ListItem
                    foreach (SPListItemVersion objVersion in objVersionColl)
                    {
                        if (iVersionID == objVersion.VersionId)
                        {
                            DataRow dr1 = dt1.NewRow();
                            foreach (SPField field in objVersion.Fields)
                            {
                                if (!dt1.Columns.Contains(field.Title))
                                {
                                    dt1.Columns.Add(field.Title);                                   
                                }
                                dr1[field.Title] = objVersion[field.Title] ==
                             null ? "" : objVersion[field.Title].ToString();
                            }
                            dt1.Rows.Add(dr1);
                            break;
                        }                                         
                    }                   
                }
            }