SharePoint 2013 (and previous versions) uses a
client side “token” to validate posts back to SharePoint to prevent
attacks where the user might be tricked into posting data back to the
server. This token is known by many names; form digest or message digest or request digest. The token is unique to a user and a site and is only valid for a (configurable) limited time.
When executing non-GET REST requests to the SharePoint API,
you must add a valid request digest to your request. This digest proves
validity of your request to SharePoint. Because this token is valid only
for a limited period of time, you have to ensure that the token you
have is valid before adding it to your request or the request fails.
In classic pages, SharePoint includes a request digest token on the page in a hidden field named __REQUESTDIGEST.
One of the most common approaches to work with the request digest is to
obtain it from that field and add it to the request, for example:
Such a request would work initially, but if the user has the
page open for a longer period of time, the request digest on the page
expires and the request fails with a 403 FORBIDDEN
result. By default, a request digest token is valid for 30 minutes, so
before using it, you have to ensure that it's still valid. In the past
you had to do this manually, by comparing the timestamp from the request
digest with the current time.
Nested query is not supported. Multiple REST call is workaround. See more here
$filter does not work with Calculated column. Using POST request and CAML query is workaround. See #1
$filter does not work with Multi Valued column. Using POST request and CAML query is workaround. See #1
Term Store Management is not supported. JSOM is workaround. See example here.
Maximum URL length is 260 in GET request. This value can be modified from web.config or Using POST request and CAML query is workaround. See #1.
Date Time functions are not supported but it works with listdata.svc. Example /_vti_bin/listdata.svc/SpTutorial?$filter=month(SpDateTime) eq 6. See more here.
Get Item count from filter is not supported. Using ListData.svc is workaround. Example _vti_bin/ListData.svc/Fruits/$count?$filter=((color eq 'red')). Find more here.
This article lists out the difference between SharePoint 2013 and SharePoint 2016.
As you all know, SharePoint 2016 has too much to offer to an administrator or a developer. As an administrator, I love the changes that Microsoft has done in SharePoint 2016. I will also talk about the features, which are deprecated by Microsoft in SharePoint 2016.
SharePoint 2013 Vs SharePoint 2016.
I will try to explain all the features in the SharePoint 2016 row, which were not present in SharePoint 2013.
App Launcher
It helps SP 2016 to match the Office 365 experience by providing the users almost an identical interface to navigate both SharePoint 2016 and Office 365.
Min Roles
With SharePoint 2016, we can select the specific role of a Server and according to the role Service will be enabled on the Servers. Thus, we don’t have to worry about individually running SP Services on Specific SP Farms.
Min-Role Farm Topology
Six pre-defined roles are available to create a new Farm or join an existing Farm. SP automatically configures the Services according to the selected role.
Zero Downtime Patching
In order to take the advantage of zero downtime patching, your Farm must have a High Availability, HA and topology.
Integrated Project Server
Project Server 2016 is installed with SharePoint 2016 but it will be licensed separately.
Deprecated Features
Six features are deprecated from SharePoint 2016, if we compare it with SharePoint 2013 or the previous editions.
SharePoint Foundation – SharePoint Foundation has been removed.
Stand-Alone Installation - Stand-alone is not possible now in SP2016 for Single Server you have to make sure that SQL installed and configured.
Forefront Identity Manager Client (FIM) - In SharePoint 2016 Microsoft replace FIM with MIM.
Excel Services in SharePoint - SharePoint Server 2016 you must also deploy Office Online Server with Excel Online to ensure Excel Services functionality remains available.
Tags and Notes - You will no longer be able to create new tags or notes or even to access existing ones.
Stsadm.exe - PowerShell is the way to go but backward compatibility remains with STSADM.
PowerApps are quick, easy to create applications that will allow users to consume and edit data from multiple different sources. PowerApps allow users to create an App in order to fulfil a business requirement without having any development experience. The Apps have many built in data sources for users to consume and once they have been created they are easy to share with other users via email.
PowerApps is a service for building and using custom business apps that connect to your data and work across the web and mobile - without the time and expense of custom software development.
What data sources can they use?
As mentioned above, there are plenty of built in data sources PowerApps can use, presenting users with a simple interface to select their data source from. Popular data sources are as follows:
I have been developing on the Web client. The reason for this, to be honest, is that so far I have experienced issues with the Windows studio version. I have read that users have experienced issues with the Windows Studio after installing certain updates on Windows 8.1. This isn’t a big deal for now, PowerApps is a relatively new technology and for the app I have recently created the functionality provided by the web version was more than enough.
Creating a New App
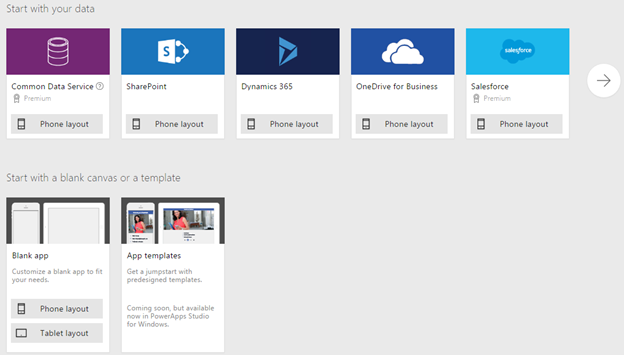
When creating an App from scratch you will be presented with a few options regarding data source and template:
I am going to go with the SharePoint option, but you can choose a template that best suits your data source. You can of course choose the blank template, but this will require a little extra effort to hook up your data source.
Once I select SharePoint it will ask me to select a SharePoint list from one of my site collections, which in this case will act as my data source. I’m going to select my finance site collection:
And then my ‘Expenses’ list:
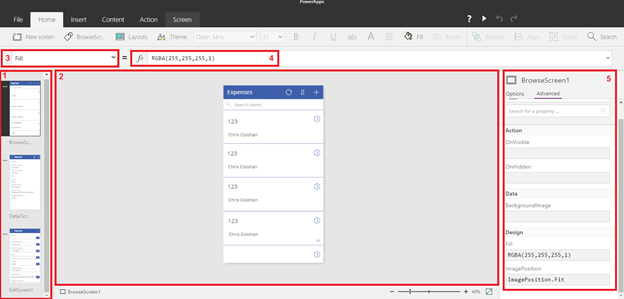
The Development environment
Once the app is created there is a quick tour that comes up. This is only a few steps long and I would advise taking this as it contains some quite helpful information. After the tour you will see the main design screen for the first time:
This has a fairly standard windows look combining the tabbed feel of the Office product suite with the property windows on the left and right hand side that users of Visual Studio will be familiar with.
Screen Thumbnails – This section displays all of the screens that make up the app. Notice that for our new app there are 3 screens already created – a browse screen to display the current list items, an edit screen to edit / add, and a display screen to allow users to view individual items
Design Workspace – This is the main area used to design and make changes to the App’s screens. From here you can highlight various fields and components on the form, as well as adding in new items via the inset tab.
Property Drop down menu – The drop down menu allows you to select the various properties of the highlighted component, whether it be the whole screen or an individual field, and edit the properties of that component. This can range from adding a formula on screen load to changing the font size of a text box.
Formula Bar – Used to add in values or formulas for specific properties or event handlers i.e. updating an items default text, changing the background color of an item when it is highlighted via the OnSelect event handler.
Properties Window – Allows users to view all properties of the highlighted component at once and edit them, as opposed to the property drop down menu which only shows one at a time.
Top Ribbon Options
The Top Ribbon Bar has the following options:
File – Standard Office File Menu, options such as save, Open Collections (used to hold global variables), Media (used to upload media files) and Share (used to publish apps, will come back to this later).
Home – Provides options to create a new screen, edit a screen, change layout plus the standard options for text editing
Content – Contains options to add and removed content for Media, Collections and Data Sources.
Action – Allows users to perform various actions based on the selected control i.e. visible / hide, remove control.
Screen – Provides options to set screen layout, fill and background colour.
Formulas
Once you have added in some fields to the various screens the important functionality is taken care of in the formulas. Here are a few examples:
You may want to hide a field based on certain events, here I have added the following formula to the visible property of a control I want to hide when it doesn’t contain a value:
If(IsBlank(Division.Value), false, true)
I have added the following filter to the browse screen to ensure users only see their own items:
The following ensures the user is redirected to the correct screen when the add / edit a list item:
SubmitForm(EditForm1);Navigate(BrowseScreen1, ScreenTransition.None)
These are just a few examples of how to use the PowerApp functions, there are a lot of them! A full list of functions can be found here: https://powerapps.microsoft.com/en-us/tutorials/formula-reference/.
Publishing Apps
Microsoft refer to this as ‘Sharing’ your app, but you are making it available for other users to use so it’s more like publishing. From the file menu, select ‘Share’, you will be presented with options to add users email addresses to give them access to your app. When giving users access, you will also have the option to add them as a contributor, meaning they can update the app themselves.
Pros:
Excel knowledge transfers
No Visual Basic to learn
Filter() blows away all the Pivot Tables you would've needed in Excel
Flexible Height Gallery and Gallery.WrapCount sets PowerApps apart from Project Siena
Universal access--iOS, Android, ANY WEB BROWSER
Data can be saved, analyzed, and viewed anywhere--in app or in Excel
Ingtegration: Flow allows you to communicate information between multiple services
Media can be saved within the app--no hosting needed
You can connect to competitors including Dropbox and Google Drive
SVG works--there is a lot of unused potential here
Regular Joe can build an app: PowerApps is a low-code solution, yet it can also do complicated things if you push it.
The PowerApps team has implemented ideas shared by the community.
Cons:
You more or less need to sell Office365/PowerApps user plan if you're a developer
Apps cannot be placed on the app store like other platforms
Apps are only accessible with a Microsoft account; apps are only usable within a domain
As part of SharePoint 2013 reporting services, I was trying to
render SSAS cube data in SharePoint BI (Business Intelligence) site
library. But, when click on “Refresh All Connections” to fetch the latest data from SSAS cube I was experiencing below issue:
powerpivot data refresh error
Diagnosis this issue:
To know the issue in Excel Services we need to enable “Diagnostic Logging” which will log the connection / authentication as part log file.
Steps to enable Diagnostic Logging:
1. Log on to WFE with FARM account
2. Launch Central administration
3. Navigate to Diagnostic Logging
Central Administration -> Monitoring -> Configure Diagnostic Logging
powerpivot data refresh error access is denied
4. Select “Excel Services Application” as part of Diagnostics Logging page and click “OK” at the end of the page. sharepoint 2013 powerpivot data refresh error
5. By enabling this SharePoint will log the actual error message in
log file as part of 15 Hives, the default path for log files is:
%CommonProgramFiles%\Microsoft Shared\Web Server Extensions\15\LOGS\
6. Soon you enable diagnostics logging from client/user machine “refresh all connections” in excel (as shown in picture-1)
Note: This will give the same error but SharePoint will log the detailed error in log file
7. Navigate to log folder and open the latest log file and search for “Excel Services Application External Data” when I do it I found the below error message.
05/14/2018 18:07:55.84 w3wp.exe (0x37BC) 0x552C Excel
Services Application External Data ai2vl Information The
workbook ‘http://SharePoint13:9535/PowerPivot Gallery/SaleOrders.xlsx’
attempted to access external data using the unsupported provider
‘Provider=MSOLAP.7;Integrated Security=SSPI;Persist Security
Info=True;Initial Catalog=SaleOrders;Data Source=SharePoint13\tab;MDX
Compatibility=1;Safety Options=2;MDX Missing Member Mode=Error;Update
Isolation Level=2’. [Session:
1.V23.108d20qHa37P9g/cpouEEz514.5.en-US5.en-US36.94632022-8f93-4af2-9a9a-fd10c6df64721.A1.N
User: 0#.w|sharepoint13\spadmin]
f291659e-4995-e0b2-9f14-af19942f9e12
Error message clearly says that “attempted to access external data using the unsupported provider ‘Provider=MSOLAP.7”
Solution:
As the error message shows that excel services using a unsupported
provider we need to ensure that, MSOLAP.7 provider is part of trusted
data providers.
Follow the below steps to add the new trusted data provider:
1. Log on to WFE with FARM admin account
2. Open “Excel service application” as part of “Manage Service application”.
Central Administration -> Application Management -> Service Applications -> Manage Service Applications
powerpivot pivot table not refreshing
manage powerpivot data refresh sharepoint 2013 error
3. Select “Trusted Data Provider” to add the new provider sharepoint 2016 powerpivot data refresh error
4. Validate the list of trusted providers for “MSOLAP.7” and then click on “Add Trusted Data Provider” manage powerpivot data refresh sharepoint 2013 error Tutorial
5. Enter the provider details as shown below and click on “OK” button sharepoint 2016 powerpivot data refresh error Tutorial
6. Once the provider is added go back to user / client machine it will work seamlessly.
As part of configuring SSRS in SharePoint 2013 we need to create
data source create connection string for SSRS report. In order to do
that we need add “Report Data Source Content Type” to a document library
in SharePoint 2013. The same way we can resolve the report server
integration feature missing sharepoint 2016 issue. The solution will
work for SharePoint 2016 and SharePoint 2013.
Issue:
When I was trying to attach / associate Report Data Source content
type to document library I don’t that as part of list of content types
at site collection level.
Solution:
Please follow below steps to get Report Data Source content type.
– Navigate to Site Settings
– Click on Site collection Features
– Locate “Report Server Integration” feature deactivate and activate the feature
– Now if you try to associate the content type you can 3 new content type
1. Report Builder Model
2. Report Data Source
3. Report Builder Report
– Now you can see 3 different option when you click on new item in document library
Issue:
I was getting the below error while rendering SSRS service after installing updates in WFE in SharePoint server.
Solution & Root cause analysis:
When I started doing the root cause analysis I have realized that SSRS
service in central admin got stopped. Follow the below steps to see the
detailed error message in server logs.
1. Log on to WFE and launch central admin with FARM admin account
2. Navigate to Manage Service Applications under Application management
3. Find your Reporting Services service application and click the name of your service application
4. Click on System Settings
5. Click on Enable remote Errors in Security section
Once you once enable this in Central admin we need to enable the same setting at Site Collection level.
1. Open the site collection which are experiencing SSRS rendering issue
2. Click on Site Action and click on Site Settings
3. Click Reporting Services Site Settings in the Reporting Services group
4. Click Enable remote errors in local mode check box
Ok with this we have enabled the option of logging detailed error in server logs.
Now if you refresh the page where you are getting the above error it
will log a detailed error message in server log file. It will be as
follows:
As the error message shows we need to enable the reporting services service in central administration.
The SSRS service application proxy is not configured sharepoint 2016
Once I restart the service SSRS service is rendering as expected.
Issue:
As part SSRS reporting configuration we need to enable “Reporting Server
Integration feature” in SharePoint 2013 at Site collection level. But
when I try to enable that feature it is missing from list of features at
Site collection features.
Solution:
Please follow the below steps to fix this issue and get “Reporting
Server Integration feature” available at site collection level.
1. Log on to WFE as FARM administrator
2. Ensure that “Microsoft SQL Server 2012 RS Add-in for SharePoint” is installed in add remove programs.
3. If it is not installed download the setup from this link and install
4. If this add-in is installed select the add-in and click on repair to fix the issue.
5. As soon as you repair the software restart the WFE
6. Once all the services are up navigate to site collection level
feature you will see that “Reporting Server Integration feature” as
activated.
WHAT IS A SERVER-To-SERVER (S2S) TRUST:
– A trusted connection between client app and SharePoint Web server
– Eliminates the need of involving ACS when running apps within private networks
– Trust between Servers is configured using one or more SSL certificate
– App Server code requires access to public/private key pair of SSL certificate
– Requires creating S2S Security Token Service on SharePoint Web server(s)
On- premises App Authentication is used for setting up High Trust
apps that use the server-to-server (S2S) protocol. This is a Provider
Hosted app deployed in a private network which eliminates the need to
involve ACS for creating authentication tokens. In essence, an S2S Trust
represents a trusted connection between a client app running on a local
app server and the web servers in the SharePoint farm.
S2S (High Trust) – App Only Context:
An S2S accesses the token by calling the
GetS2SAccessTokenWithWindowsIdentity method of the TokenHelper class.
Use the TokenHelper::GetS2SAccessTokenWithWindowsIdentity method,
passing a null for the WindowsIdentity parameter.
Let’s see how we can actually utilize the “App Only” policy to
elevate user permissions. I have written the following code in the code
behind of the TestPage.aspx of S2S Provider Hosted App.
Deploy the app and then log on as a user who only has read permission
to the list. Execute the code and a new item is created even though the
user does not have permission to create items in the list. The “Created
By” and “Modified By” fields in the list will reflect that it was the
SHAREPOINT\App account that was used to create the item.
Note:
This capability is only available to provider-hosted apps, not to
SharePoint-hosted apps. In a SharePoint-hosted app, there is Full trust
code that is not limited by permissions – it can do anything it wants.
After migrating code from SharePoint 2010 to SharePoint 2013 the
calls to showModalDialog failed with message that the method cannot be
found (javascript). When checking it in IE Developer Tools this isn’t
surprising at all. The required js-file isn’t loaded.
But why? I guess it must be the new SOD-Model (Script on Demand) that was introduced in SharePoint 2013.
Follow below steps:
1. Remove the Java Script reference.
2. <script src=”/_layouts/sp.js” type=”text/javascript”></script>
3. <script src=”/_layouts/SP.UI.Dialog.js” type=”text/javascript”></script>
4. Add to the url variable “?IsDlg=1″`
5. Replace the command SP.UI.ModalDialog.showModalDialog() with the new
command SP.SOD.execute(‘sp.ui.dialog.js’,
‘SP.UI.ModalDialog.showModalDialog’, options);
After this few changes your solution will work correctly.
Note: I first tried the “executeOrDelayUntilScriptLoaded”-function.
But it was not of much help. It just “swallowed” my function call but
never executed it because the js-file I specified was never loaded.