What are PowerApps?
PowerApps are quick, easy to create applications that will allow users to consume and edit data from multiple different sources. PowerApps allow users to create an App in order to fulfil a business requirement without having any development experience. The Apps have many built in data sources for users to consume and once they have been created they are easy to share with other users via email.PowerApps is a service for building and using custom business apps that connect to your data and work across the web and mobile - without the time and expense of custom software development.
What data sources can they use?
As mentioned above, there are plenty of built in data sources PowerApps can use, presenting users with a simple interface to select their data source from. Popular data sources are as follows:- SharePoint
- SQL Server
- Dynamics 365
- Office 365 Users
- Office 365 Outlook
- Excel
- OneDrive for Business
- OneDrive
- Dropbox
How are they Developed?
Power Apps can be developed in one of 2 places:- PowerApps Studio for Windows
- PowerApps Studio for Web
Creating a New App
When creating an App from scratch you will be presented with a few options regarding data source and template: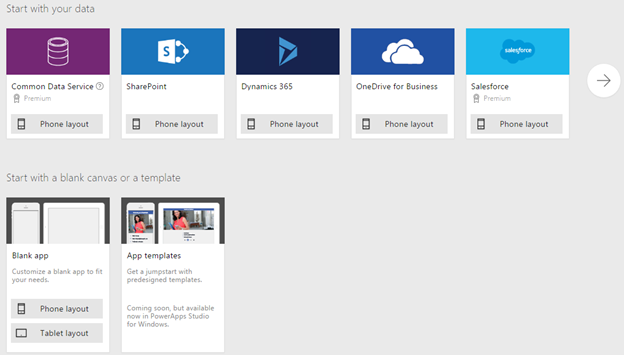
I am going to go with the SharePoint option, but you can choose a template that best suits your data source. You can of course choose the blank template, but this will require a little extra effort to hook up your data source.
Once I select SharePoint it will ask me to select a SharePoint list from one of my site collections, which in this case will act as my data source. I’m going to select my finance site collection:

And then my ‘Expenses’ list:

The Development environment
Once the app is created there is a quick tour that comes up. This is only a few steps long and I would advise taking this as it contains some quite helpful information. After the tour you will see the main design screen for the first time: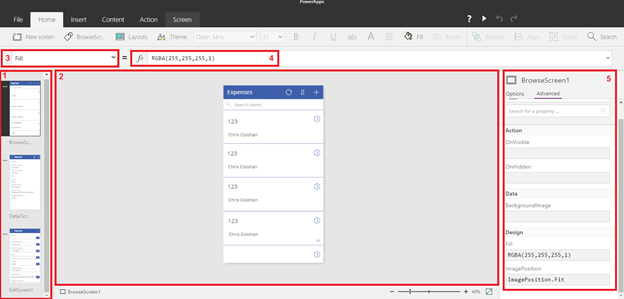
This has a fairly standard windows look combining the tabbed feel of the Office product suite with the property windows on the left and right hand side that users of Visual Studio will be familiar with.
- Screen Thumbnails – This section displays all of the screens that make up the app. Notice that for our new app there are 3 screens already created – a browse screen to display the current list items, an edit screen to edit / add, and a display screen to allow users to view individual items
- Design Workspace – This is the main area used to design and make changes to the App’s screens. From here you can highlight various fields and components on the form, as well as adding in new items via the inset tab.
- Property Drop down menu – The drop down menu allows you to select the various properties of the highlighted component, whether it be the whole screen or an individual field, and edit the properties of that component. This can range from adding a formula on screen load to changing the font size of a text box.
- Formula Bar – Used to add in values or formulas for specific properties or event handlers i.e. updating an items default text, changing the background color of an item when it is highlighted via the OnSelect event handler.
- Properties Window – Allows users to view all properties of the highlighted component at once and edit them, as opposed to the property drop down menu which only shows one at a time.
Top Ribbon Options
The Top Ribbon Bar has the following options:- File – Standard Office File Menu, options such as save, Open Collections (used to hold global variables), Media (used to upload media files) and Share (used to publish apps, will come back to this later).
- Home – Provides options to create a new screen, edit a screen, change layout plus the standard options for text editing
- Insert – Allows users to insert controls onto a page (full list of controls can be found here: https://powerapps.microsoft.com/en-us/tutorials/reference-properties/ )
- Content – Contains options to add and removed content for Media, Collections and Data Sources.
- Action – Allows users to perform various actions based on the selected control i.e. visible / hide, remove control.
- Screen – Provides options to set screen layout, fill and background colour.
Formulas
Once you have added in some fields to the various screens the important functionality is taken care of in the formulas. Here are a few examples:- You may want to hide a field based on certain events, here I have added the following formula to the visible property of a control I want to hide when it doesn’t contain a value:
- I have added the following filter to the browse screen to ensure users only see their own items:
- The following ensures the user is redirected to the correct screen when the add / edit a list item:
These are just a few examples of how to use the PowerApp functions, there are a lot of them! A full list of functions can be found here: https://powerapps.microsoft.com/en-us/tutorials/formula-reference/.
Publishing Apps
Microsoft refer to this as ‘Sharing’ your app, but you are making it available for other users to use so it’s more like publishing. From the file menu, select ‘Share’, you will be presented with options to add users email addresses to give them access to your app. When giving users access, you will also have the option to add them as a contributor, meaning they can update the app themselves.Pros:
- Excel knowledge transfers
- No Visual Basic to learn
- Filter() blows away all the Pivot Tables you would've needed in Excel
- Flexible Height Gallery and Gallery.WrapCount sets PowerApps apart from Project Siena
- Universal access--iOS, Android, ANY WEB BROWSER
- Data can be saved, analyzed, and viewed anywhere--in app or in Excel
- Ingtegration: Flow allows you to communicate information between multiple services
- Media can be saved within the app--no hosting needed
- You can connect to competitors including Dropbox and Google Drive
- SVG works--there is a lot of unused potential here
- Regular Joe can build an app: PowerApps is a low-code solution, yet it can also do complicated things if you push it.
- The PowerApps team has implemented ideas shared by the community.
Cons:
- You more or less need to sell Office365/PowerApps user plan if you're a developer
- Apps cannot be placed on the app store like other platforms
- Apps are only accessible with a Microsoft account; apps are only usable within a domain
No comments:
Post a Comment