When you want to use external data, such as data from your other
business applications or partner resources) in SharePoint, you can use
Business Connectivity Services (BCS) together with Secure Store. And,
you can manage BCS and Secure Store right in the SharePoint admin
center. The external data source that you can connect to is called a
Secure Store Target Application, or just a Target Application.
How the Secure Store Service Works
Create a Target Application
How the Secure Store Service Works
The Secure Store Service is designed to create a background
mapping between a group of users in SharePoint, and a single user known
to the external data system. When the Secure Store Service is properly
configured, the following occurs:
- A user authenticates through Internet Information Services (the
web server technology underlying SharePoint technologies) to SharePoint
Online via valid credentials.
- Inside SharePoint Online, the Secure Store Service uses mapped
credentials known to the external business application to render any
necessary external data on the site for the authenticated user.
Create a Target Application
- Sign in to Office 365 as a global admin or SharePoint admin.
- Select the app launcher icon
 in the upper-left and choose Admin
to open the Microsoft 365 admin center. (If you don't see the Admin
tile, you don't have Office 365 administrator permissions in your
organization.)
in the upper-left and choose Admin
to open the Microsoft 365 admin center. (If you don't see the Admin
tile, you don't have Office 365 administrator permissions in your
organization.) - In the left pane, choose Admin centers > SharePoint.
- Click secure store
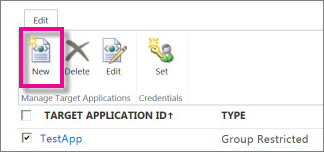
- In the Manage Target Applications group on the ribbon, click New.
- In the Target Application Settings section, enter values for the following fields:
- Target Application ID. You might find it useful
to assign a meaningful name. For example, if you are connecting to
source that contains employee data, you might enter EmployeeTargetApp.
- Display Name. This field should be a user-friendly name for the Target Application. For example, you might use Employee Data.
- Contact E-mail Enter a valid email address for people to use when they have questions.
- Target Application Type. By default, SharePoint Online uses type Group Restricted.
- In the Credential Fields section, enter the Field Names and Field Types
for the credentials that are required to access data in the Target
Application. These fields determine how you will map identity in the
Secure Store Service. By default, the Credential Fields list the Windows
User Name and Windows Password with matching Field Types (User Name and
Password), and specifies that the password is masked.
- In the Target Application Administrators
section, enter a list of users, or use the Browse button to search for
the name of a group. This section usually contains the account of the
SharePoint Online Administrator, or a global Administrator.
- In the Members section, enter a list of users or
SharePoint Online groups of users who need to access the target
application. Or, you can use the Browse button to search for the name of
a group that you want to map to the Target Application.
- Click OK to accept this configuration and return to the Secure Storage Service page. The new Target Application appears on the page.
Edit settings for a Target Application
- Sign in to Office 365 as a global admin or SharePoint admin.
- Select the app launcher icon in the upper-left and choose Admin
to open the Microsoft 365 admin center. (If you don't see the Admin
tile, you don't have Office 365 administrator permissions in your
organization.)
- In the left pane, choose Admin centers > SharePoint.
- Click secure store.
- Select an existing Target Application from the list of Target Applications.
- On the ribbon, click Edit.
NoteSome fields on the Edit page are not available. These elements cannot be edited. After you create a Target Application, you can't change the Target Application ID, Target Application Type, or Credentials Fields.
- Select any of the following to edit the contents:
- Display Name
- Contact E-mail
- Target Application Administrators
- Members
- Click OK.
- Sign in to Office 365 as a global admin or SharePoint admin.
- Select the app launcher icon in the upper-left and choose Admin
to open the Microsoft 365 admin center. (If you don't see the Admin
tile, you don't have Office 365 administrator permissions in your
organization.)
- In the left pane, choose Admin centers > SharePoint.
- Click secure store.
- Select a single Target Application from the list if you have created more than one.
- In the Credentials group on the ribbon, click Set. This opens the Set Credentials for Secure Store Target Application (Group)
dialog box. When you set credentials, you map a Target Application
Group to a single set of credentials for an external data system.
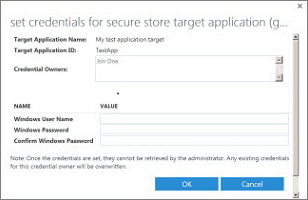
- In the Set Credentials for Secure Store Target Application (Group) dialog box, enter the credential values that you want. The credential fields that you enter apply to the external data system.When you finish entering values for credential fields, click OK.